Do you think you have spider mites?
If you suspect that you have spider mites on your plants, it’s important to act quickly. These pests reproduce rapidly, making it more challenging to eliminate them the longer you wait. A mild infestation can reduce your crop yields by 20% to 30%, and if left untreated, it can render your entire crop useless. Spider mites are notoriously difficult to eradicate, earning them the nickname “The Borg.” Even if you manage to eliminate all visible mites, a single egg can result in a new infestation.
Fortunately, identifying spider mites is a simple process, and eliminating them is relatively easy if you have the right products and knowledge. Without the proper tools, however, battling spider mites can become a costly and never-ending process. In this article, we will discuss how to identify and effectively eliminate spider mites, as well as various preventative measures you can take to ensure that these pests don’t become a recurring problem. By following our expert advice, you can ensure that spider mites will be a thing of the past.
How do I get spider mites?
Spider mites are a common problem that can affect indoor cannabis grows, and it’s important to understand how they can enter your grow room so that you can take preventative measures. There are two primary ways that spider mites can infiltrate your grow space.
The first way is through the introduction of infested plant materials from outside. Spider mites can hitch a ride on clothing, pets, or even through ventilation systems, making it important to thoroughly inspect all plant material before bringing it into your grow room. If you live in an area with a high prevalence of spider mites, it’s especially important to take precautions to avoid introducing them to your grow space.
The second way spider mites can enter your grow room is through the introduction of infested clones from other growers. This is why many commercial growers prefer to grow from seeds rather than clones, as it reduces the risk of introducing pests to their grow space. If you receive a clone from another grower, it’s important to inspect it carefully for any signs of spider mites before adding it to your grow room.
In addition to these two primary routes of entry, spider mites can also be introduced to your grow space through contaminated equipment, such as pruning shears or trellis netting. To prevent this, it’s important to regularly clean and sanitize all equipment used in your grow room.
By being aware of the various ways that spider mites can enter your grow space, you can take proactive steps to prevent their introduction and keep your plants healthy and pest-free.
How do I identify spider mites and know if my plants have them?
Identifying spider mites is crucial to catching an infestation early and preventing significant damage to your plants. Fortunately, there are several key signs to look out for.
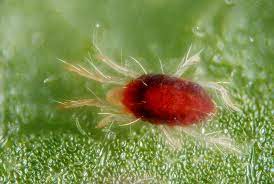
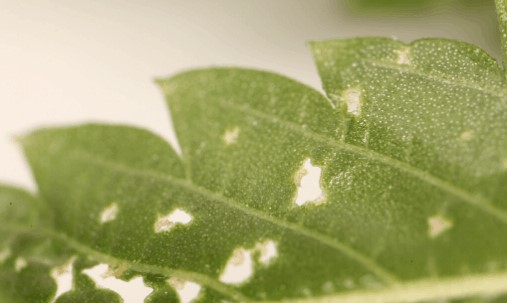
Spider mites are very small and difficult to see with the naked eye, so it’s important to inspect your plants closely. One common sign of spider mites is the presence of small dots on the undersides of leaves, which may be the size of a grain of salt. Additionally, you may notice some webbing on the underside of the leaves.
As an infestation progresses, you may notice small yellow or pale dots on the top of leaves, which are caused by the spider mites piercing the surface of the leaves to feed. If left untreated, the leaves on your plants may start to curl and claw, and you may notice severe webbing throughout the plant.
To confirm the presence of spider mites, you can use a magnifying glass to inspect the undersides of leaves for small, oval-shaped mites with eight legs. It’s important to catch an infestation early and start treatment immediately to prevent further damage.
Regular inspection and monitoring of your plants is essential to catching spider mites before they can cause significant damage. Consider using a jeweler’s loupe or a microscope to get a closer look at the undersides of leaves, and always inspect new plants before introducing them to your grow room to prevent the introduction of spider mites or other pests.
How do spider mites affect my plants and bottom line?
The spider mites feed off the inside of your plant’s leaves, this is what causes the damage to your plants. All leaves have microscope holes (called Stomata) that open and close to regulate how much water is transpired (let off) from the plant.
The holes the spider mites are creating in your leaves will begin to let off excess amounts of water. Your plant will respond by closing all of the Stomata in an effort to slow the loss of water. The problem is the plant uses the Stomata to intake and exhaust CO2 and Oxygen. If they aren’t functionally properly your plants will suffer and so will your yield.
At this point, you might as well have a spider mite infestation inside your wallet feeding off your hard-earned money.
Why is it so hard to prevent spider mites?
Preventing spider mites can be a challenging task, but it is not impossible. One of the main reasons why it is so hard to prevent spider mites is because they are highly adaptable and can quickly develop resistance to traditional pesticides. This means that using the same product repeatedly will become less effective over time.
Moreover, spider mites can easily develop resistance to pesticides because they reproduce at an astonishing rate. They produce a new generation every 3-5 days, which means that they can evolve rapidly to adapt to new conditions.
Additionally, spider mites are attracted to warm and dry environments, which are common conditions in indoor grow rooms. This makes it easier for them to reproduce and infest your plants. They are also able to spread through air currents, so even the slightest draft can bring in spider mites from the outside.
To effectively prevent spider mites, it is crucial to maintain a clean and healthy environment for your plants. Regularly inspecting and cleaning your plants, as well as controlling the humidity and temperature levels in your grow room, can help to minimize the chances of spider mite infestations. Additionally, using preventive measures like neem oil or predatory mites can also be effective in keeping spider mites at bay.
Effectively controlling spider mites
The key to effectively controlling spider mites is to spray and to spray often, when you spray your plant it only kills the adult spider mites leaving the eggs free to hatch and reproduce. You have to wait for them to hatch and spray again.
Know that the eggs take about 3 days to hatch which means you will have spider mite eggs on your plants hatching at different times over the course of the next few days even AFTER all the adult spider mites are killed, you will need to spray your plants every day for the next 3 or 4 days to even have a fighting chance.
Killing Spider Mites
Spider mites can be challenging to control once they infest your plants. While many growers opt for pesticide-based products, they are toxic to humans and animals and can become ineffective over time due to mites’ resistance. This section highlights a safer, organic, and more effective method that you can use to kill spider mites.
Neem Oil and Yucca Extract Combination
Neem oil suffocates spider mites by clogging their tiny pores without building immunity, making it an ideal choice. However, Neem oil alone cannot kill spider mites since they have a natural defense mechanism against suffocation. When sprayed on spider mites, air bubbles are trapped in their exoskeleton, allowing them to survive. You need a wetting agent to reduce the surface tension of the Neem oil and water mixture to prevent air bubbles from entering the pores. One of the best wetting agents is Yucca extract.
Why Yucca Extract?
Using dish soap as a wetting agent can clog the stomata of your plants, but Yucca extract is safe to use and has many benefits, including being organic, natural, and biodegradable. It can also reduce plant stress, treat and prevent fungal diseases, and can be added to nutrient water to increase penetration into the soil.
Organic Spider Mite Exterminator Spray Recipe
Killing spider mites with Neem and Yucca Extract is quite easy. Here is a simple recipe:
Ingredients:
- 1 gallon of water
- 20mL of Neem (4 teaspoons)
- 5mL of Yucca Extract (1 teaspoon)
Instructions:
- Add the Neem and Yucca Extract to the gallon of water and mix thoroughly.
- Pour the mixture into a garden sprayer and shake well before use.
- Spray the mixture on the affected plants, making sure to coat both the tops and undersides of the leaves.
- Reapply every five to seven days until the infestation is under control.
Using this method can be an effective way to control spider mite infestations while keeping your plants and environment safe from harmful chemicals.
Preventing Spider Mites
If you got spider mites once you can get them again. I recommend spraying your plants once every week or two to help kill any spider mites that may have cropped back up.
I also recommend giving your plants a dose of Neem through the root zone once per week. It will help to increase your plant’s immune system and prevent things like fungus growth, insect damage, and more. When feeding Neem through the root zone simply add 20mL to a gallon, with 5ml of Yucca extract, and soak the top of the soil thoroughly. The Neem and Yucca Extract will travel through your plant’s root zone, up the stem, and into the leaves giving it protection from undesirables.

Is it safe during flowering?
Yes, unlike dangerous pesticides, Neem and Yucca extract are 100% safe to use during flowering. Neem does smell bad so it can cause your finished bud to smell funky. It is not recommended you use Neem within the last 2 weeks of flowering. I personally wouldn’t want to smoke bud sprayed with Neem late in flowering but no scientific proof shows it will do any damage to the human body.
If you use Neem during flowering I recommend you spray your plants with just plain water 48 hours after spraying with Neem to help remove any residue and smell.
What type of Neem do I get?
A number of companies make Neem specifically for plants. Pay attention because many of them only have a small percentage of the active ingredient (Azadirachtin) and use an extracted form. It is not uncommon to have to use three or four times as much and have it still not be as effective as “the right stuff”.
Certain companies do this so they can sell a product that looks “less expensive” than the competition. Many consumers don’t even realize until they use the product and find out it doesn’t work.
When looking for a quality neem product you want to look for two things.
- That it is Cold Pressed Neem, meaning it is 100% Neem and contains no additives like “neem extracts” that most Neem products are made from.
- A Neem product that has a minimum of 3500 PPMs (parts per million) of Azadirachtin, the active ingredient.