
Autoflower weed seeds are the hot thing in the global cannabis seed industry. In the last decade, their use has jumped, here in Canada, by tens of percent. In light of the high demand and in line with their growing popularity in local growing cabinets, here are ten simple, important and effective tips for the fruitful growing of autoflower cannabis varieties.
A quick look at the list of popular weed strains in Canada in recent years proves that the people living in cooler climates prefer not to take a risk and choose to grow plants in a short time, over cultivating large and massive plants in a process that may take more than four months. It is therefore not surprising that autoflowering cannabis strains have become very common in Canada, and in fact, these are the strains with the highest demand on the part of Canadian home growers today.
Autoflower weed seeds are strains that are genetically already “programmed” to produce flowers according to their “biological clock”, and not by exposure to the number of hours of light and darkness as regular cannabis strains do. This “patent” is a breakthrough because it frees growers from the need to wait for a certain period of the year to start planting the plants as well as the duration of the long growth. The automatic cannabis strains have one or another hereditary connection to the cannabis family that not many people know – “Ruderalis” – which, unlike “Indica” and “Sativa”, is very small and grows like grass.
Although autoflower cannabis strains are not fundamentally different from regular cannabis strains, their short life cycle and nature of growth lead to a number of differences. Here are some essential tips that you should review before starting auto-flowering seeds:
1. When is it correct to plant an automatic strain
In the northern hemisphere, the longest day comes around June 21st. The number of light hours on this day ranges from 16 to 22 consecutive light hours, with the sun at the best angle – allowing the plant to get excellent exposure.
In many areas, the spring season provides an ideal temperature for planting automatic varieties outdoors (minimum 14 degrees), especially in late May or early June. If the plants are planted too early in the open air, they may produce a small and insufficient crop. This happens in part because the rash will accelerate due to the low temperatures prevailing at night. If the temperature drops below 7 degrees, it is very possible that the plants will stretch too much and the growth rate will be significantly delayed.
Taking into account the average flowering time of automatic cannabis varieties (most start flowering as early as two to three weeks after germination), it would be wise to start their life cycle in the June 10 area so that plants receive plenty of sunlight each day, and their transition to flowering It will occur in parallel with the shortening of daylight hours – a parameter which is known to be a very significant trigger for the plant to start flowering.
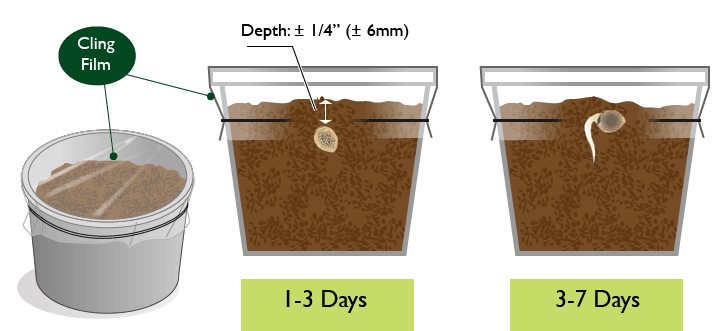
2. How to germinate autoflower weed seeds
First of all the autoflower weed seeds should be stored in ideal conditions. A clean refrigerator at a temperature of 4-5 degrees and low humidity percentages, will definitely do the job.
Extreme care and gentleness are needed during seed germination. Soak your seeds in balanced acidity water (pH level of 5.5 – 6). The seeds are supposed to sink to the bottom relatively quickly, and some may even take root in less than a day.
If after 24 hours the seed begins to germinate, it can be planted in its designated final pot. If the seed has not yet taken out a root, it can be placed on a plate between two damp pieces of paper towel, and place the plate in a dark place (or at least not exposed to direct light). After a few days, the seeds should germinate.
3. Environment suitable for autoflower weed seeds
It is important to maintain proper moisture content. During germination, 80% moisture and even more are needed. Then, during the first growth period of the plant, it is desirable to lower the humidity to the region of 55% to 70%.
Some growers place a transparent “dome” on the young plants to ensure high moisture content (similar to what is done with cuttings ). A cut plastic bottle can fit this purpose. At a later stage, the plants will be too large to stay in a dome and cold steam diffusers or other vaporizers can be introduced into the space that will increase the humidity percentage in the area, in addition to a slight cooling of the temperature.
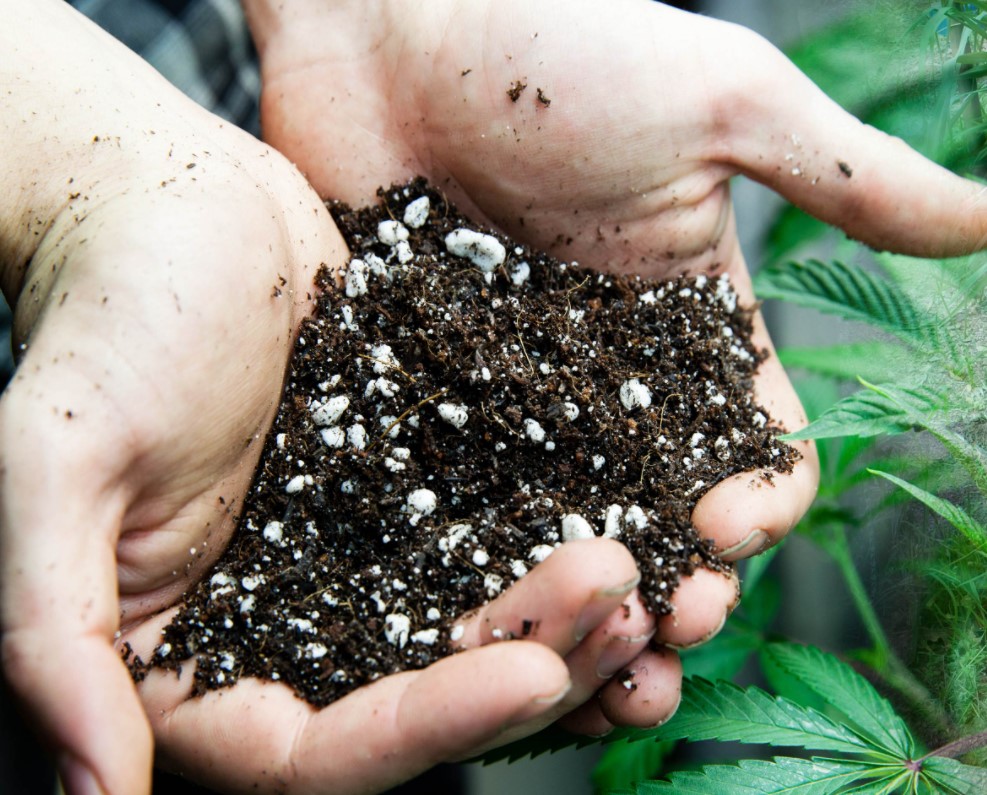
4. The best growing medium for autoflower weed seeds
There is no reason to cut corners in this parameter. The final crop yield will be directly related to your genetics, growing medium, fertilizer quality and environmental conditions. Remember, over-watering and over-fertilization are among the most common mistakes that beginner growers make.
Ventilate the substrate with Hydroton
The substrate should have as airy a texture as possible. It is therefore advisable to add to the substrate anything that will contribute to improving its airiness and water retention capacity, such as coconut fibre, Hydroton, perlite, vermiculite and the like.
5. Avoid over-watering
One of the worst things that can happen to a plant is excess water. In this condition, the roots suffocate and are unable to transfer nutrients to the rest of the plant. An over-irrigated plant will show signs of growth retardation, which novice growers can sometimes interpret as a lack of nutrients, causing them to further complicate the situation when they add more fertilizer – and more water – to a plant that is already suffocated anyway.
The water should also be dosed
A simple and effective method of estimating the right amount of water is to simply lift the pot after watering and notice its weight (no exact figure is needed of course). A day or two later if you lift the same pot again you will surely feel the difference in weight.
Another indication that some growers recommend is to water the plant at about 20% of the volume of the pot in which it sits: this means that if the cannabis sits in a pot of 15 litres, then watering about 3 litres of water (and fertilizer ) will suffice for that matter. It is very important in growing the soil that the roots have a short period of relative dryness before the next watering.
6. How to fertilize Autoflowers
Relative to the regular cannabis strains (photoperiod) it can be said that the autoflower strains are more sensitive to massive feeding. Autos have a root system that is slightly smaller and finer (compared to regular varieties) so many growers prefer to start fertilizing at half the recommended dose and then gradually increase the fertilizer concentration.
If the growing medium is sufficiently ventilated and rich in compost and positive bacteria with humic and folic acids (which contribute, among other things, to the efficient transport of nutrients in the plant), then in this case for the automatic varieties no significant addition or external fertilizer is needed. However, it is possible and even desirable to add supplements (with a low concentration of minerals) and various growth accelerators.
7. Is it allowed to train and stress an autoflower plant
For regular cannabis varieties, the general recommendation would be to do most of the pruning / tying work etc. mainly in the growth stage and leave the plant alone during the flowering stage – so too with the automatic varieties.
Since the time span in which these varieties are in a vegetative state (growth only) is relatively very short, it is advisable to seriously consider the feasibility of these maneuvering actions. In the case where the plant began to bloom quickly even before it had developed enough, it is advisable not to perform any training in it at all.
If the grower insists on performing training on the plant, it is recommended to avoid techniques that have the potential to cause a prolonged state of stress (pressure, ‘stress’) relative to the plant, so it is best to tie the plant instead of pinching it.
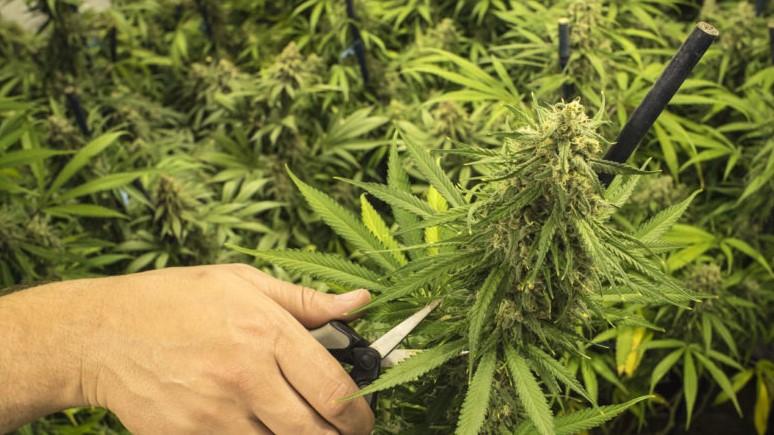
8. How to harvest an autoflower weed plant
There are cannabis growers who tend to make a gradual harvest of the plant. First, they take down the main branches, and after 7-10 days they take down the rest of the plant. This pattern of action means that even the lower branches (which usually receive less light and develop a little slower) will have time to ripen properly at harvest time.
Another recommendation in this regard would be not to blindly rely on the “manufacturer’s instructions” of the seed company or variety developers regarding the harvest date, as these were given according to certain environmental and growing conditions (usually optimal conditions), so they will sometimes be so inaccurate. It is therefore advisable to closely monitor the condition of the trichomes in the plant. Make the harvest according to the examining eye of the grower. Remember that patience pays off, and waiting another week in most cases will only do good.
9. Automatic cannabis grown organically
Most farmers have a clear and short-term view of plant nutrition: bombard the roots with salts and minerals that can be quickly absorbed through synthetic nutrients, which can increase the potential for problems such as over-fertilization or soil contamination.
A growing medium rich in organic nutrients can satisfy the needs of the plant throughout the growing cycle. In addition, there is minimal environmental damage during its use as well as a significantly lower chance of overfertilization, as most organic fertilizers are considered more forgiving compared to chemical fertilizers.
Today you can find an abundance of organic fertilizer products based on materials such as compost, guano, seaweed and the like, and all of them are available for purchase in select hydro stores.
10. You should plan your next planting in advance
In many areas around the world (including parts of Canada) it is possible to harvest at least two cycles of auto-cultivated varieties, but this requires a little forethought and germination of the seeds of the next growing cycle about a month before the harvest date of the current cycle. In this situation it will be possible to harvest the first growing cycle around mid-June, leaving enough time for the plants in the next round to properly enjoy the remaining summer days.
You forgot the most important tip, talk to your plants lol.