When it comes to growing healthy and thriving cannabis plants, one of the most crucial factors to consider is the pH levels in Cannabis soil. pH, which stands for Potential Hydrogen, measures the acidity or alkalinity of a substance. In the context of gardening, pH plays a vital role in nutrient uptake by plants. Maintaining the ideal pH range ensures that your cannabis plants can absorb the necessary nutrients for optimal growth and development.
In this comprehensive guide, we will explore the significance of pH in cannabis cultivation and provide step-by-step instructions on how to measure the pH levels in your cannabis soil. By understanding and monitoring the pH of your soil, you can address any imbalances and create the ideal environment for your plants to thrive.
The Importance of pH Levels in Cannabis Soil
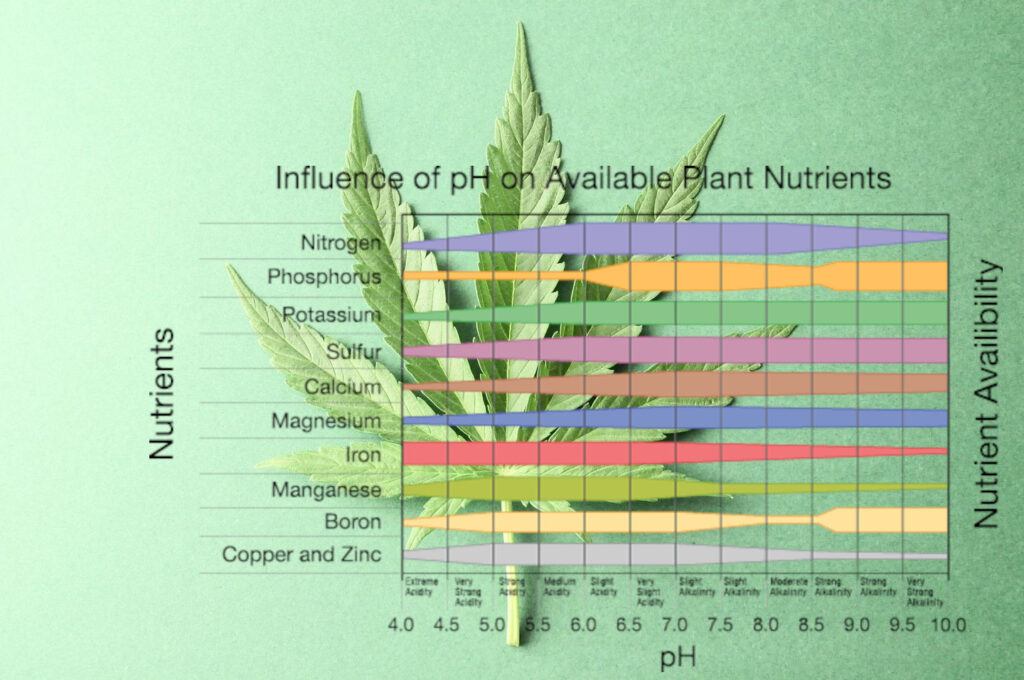
To understand the importance of pH in cannabis cultivation, it’s essential to grasp the basic biological function of plants. Plants require 16 essential elements for their growth, which are categorized as micro and macronutrients. However, for plants to uptake these nutrients effectively, they must be fed within the appropriate pH range.
When the pH of the nutrient solution is within the ideal range, cannabis plants can absorb essential macro elements such as nitrogen, phosphorus, and potassium, along with micronutrients that prevent common deficiencies and promote healthy growth. On the other hand, if the pH is too high or too low, plants may experience nutrient lockout, deficiencies, and the accumulation of salts, leading to stunted growth and other issues.
Understanding the pH Scale and Nutrient Uptake
pH is measured on a scale of 0-14, with 7 being considered neutral. Values below 7 indicate an acidic environment, while values above 7 indicate alkalinity. In the case of cannabis plants in peat moss or soil-based systems, the ideal pH range for nutrient uptake is typically between 6.0 and 6.5. This range is often referred to as the “sweet spot” for cannabis cultivation.
Maintaining the pH within this range allows plants to access the necessary nutrients for healthy development. The chart below provides an overview of the ideal pH range for cannabis plants:
| pH Level | Description |
|---|---|
| 5.0 – 6.0 | Slightly acidic; potential nutrient issues |
| 6.0 – 6.5 | Ideal soil pH range for cannabis plants |
| 6.5 – 7.0 | Slightly alkaline; potential nutrient issues |
It’s important to note that different growing mediums may have slightly different optimal pH ranges. It’s recommended to refer to specific guidelines or consult with experts if you’re using a different medium.
Identifying Problems Caused by pH Imbalances
Detecting pH imbalances is crucial for maintaining the health of your cannabis plants. Discoloration, mutation, and poor growth can often be attributed to pH issues. Just like trying to eat a steak through a straw, plants fed at pH levels far outside the ideal range struggle to absorb and utilize nutrients effectively.
If you notice abnormal growth patterns or signs of nutrient deficiencies, it’s likely that your plants are experiencing pH-related problems. Common issues associated with pH imbalances include medium acidification, nutrient lockout, deficiencies, and salt buildup. By testing the pH of your soil and addressing any imbalances, you can prevent these problems and ensure optimal growth.
How to Test the pH Levels in Cannabis Soil
Testing the pH levels of your cannabis soil is a straightforward process that requires a few simple steps. By following these steps, you can accurately assess the pH and make any necessary adjustments to create an optimal growing environment for your plants.
Step 1: Gather the Necessary Materials
Before you begin testing the pH of your cannabis soil, make sure you have the following materials:
- pH testing kit or pH meter
- Distilled water
- Small containers for collecting soil samples
- Mixing spoon or stick
Having these materials ready will ensure a smooth testing process and accurate results.
Step 2: Collect Soil Samples
To test the pH of your cannabis soil, you need to collect samples from different areas of your growing area. This helps account for any variations in pH within the soil. Use a small trowel or shovel to dig into the soil and collect samples from various depths. Aim for a representative sample that reflects the overall condition of your soil.
Avoid collecting samples from areas that have recently been fertilized or amended, as this can affect the pH reading. Additionally, remove any debris or plant matter from the soil samples to obtain accurate results.
Step 3: Prepare the Soil-Water Solution
Once you have collected the soil samples, combine them in a clean container and mix them thoroughly using a spoon or stick. The goal is to create a homogenous mixture that represents the average pH of your soil.
Next, add distilled water to the soil sample. The general ratio is 1 part soil to 2 parts water. For example, if you have 100 grams of soil, add 200 milliliters of distilled water. Mix the soil and water solution well, ensuring that the soil particles are fully suspended in the water.
Step 4: Test the pH
Now it’s time to test the pH of the soil-water solution. Depending on the pH testing method you have chosen, follow the instructions provided with the testing kit or pH meter.
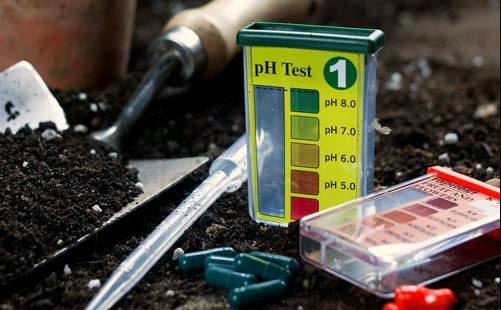
If you are using a pH testing kit, typically, you will need to add a few drops of the provided indicator solution to a small sample of the soil-water solution. The solution will change color based on the pH level. Compare the color of the solution to the color chart provided with the kit to determine the pH value.
If you are using a pH meter, carefully dip the electrode into the soil-water solution and wait for the reading to stabilize. The pH meter will display the pH value directly. Make sure to calibrate your pH meter according to the manufacturer’s instructions before use.
Step 5: Interpret the Results
Once you have obtained the pH reading, interpret the results based on the ideal pH range for cannabis plants. Ideally, the pH of your soil should fall within the range of 6.0 to 6.5 for most soil-based systems. However, a pH range slightly higher or lower can still be acceptable.
If the pH reading deviates more than 1.0 from the ideal range, it indicates a significant pH imbalance that needs to be addressed. pH values below 5.5 or above 7.0 require immediate action to restore the pH to an optimal level.
Correcting pH Levels in Cannabis Soil
If the pH of your cannabis soil is outside the ideal range, it’s essential to take corrective measures to restore balance. The specific actions you need to take depend on whether the pH is too high or too low.
pH Too Low (Acidic Soil)
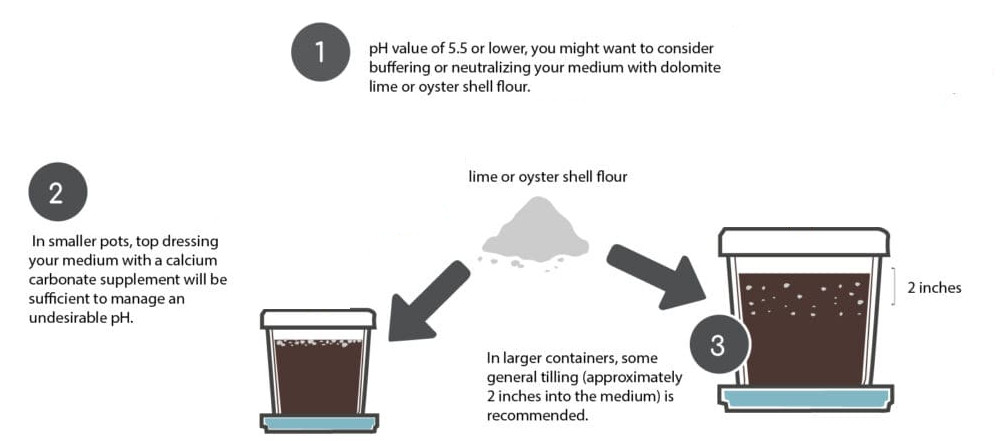
When the pH of your cannabis soil is too low (below 6.0), it indicates acidic soil conditions. Acidic soil can lead to less nutrient absorption and poor plant growth. To raise the pH and neutralize the acidity, you can use the following methods:
- Dolomite Lime: Dolomite lime is a natural product that contains calcium carbonate and magnesium carbonate. It helps raise the pH of acidic soil gradually. Apply dolomite lime according to the manufacturer’s instructions, considering the size of your growing area and the severity of the acidity.
- Oyster Shell Flour: Oyster shell flour is another natural product rich in calcium carbonate. It can effectively raise the pH of acidic soil when applied in the correct amounts. Follow the recommended dosages provided by the manufacturer to achieve the desired pH level.
For smaller pots or containers, you can simply top-dress the medium with the appropriate amount of dolomite lime or oyster shell flour. For larger containers or garden beds, it’s recommended to mix the amendments into the soil to a depth of around 2 inches.
pH Too High (Alkaline Soil)
If the pH of your cannabis soil is too high (above 6.5), it indicates alkaline soil conditions. Alkaline soil can lead to nutrient deficiencies as certain nutrients become less available to plants. To lower the pH and restore balance, you can use the following methods:
- Sulfur: Elemental sulfur is a common amendment used to lower pH in alkaline soil. When added to the soil, sulfur reacts with moisture and soil bacteria to produce sulfuric acid, gradually reducing the pH. Consult the package instructions for the recommended amount and application method.
- Organic Matter: Adding organic matter to alkaline soil can help improve its pH over time. Organic matter, such as compost or well-rotted manure, contains acids that can naturally lower the pH. Incorporate organic matter into the soil by mixing it thoroughly.
It’s important to note that correcting pH imbalances is a gradual process. Monitor the pH levels regularly and make adjustments as needed to ensure your cannabis plants receive the optimal pH for nutrient uptake.
Monitoring pH Levels in Cannabis Soil and Nutrient Uptake
After taking corrective measures to adjust the pH of your cannabis soil, it’s crucial to continue monitoring the pH levels to ensure they remain within the optimal range. Regularly testing the pH of the runoff water can provide valuable insights into the pH conditions at the root zone.
Step 1: Water Your Plants Until Runoff
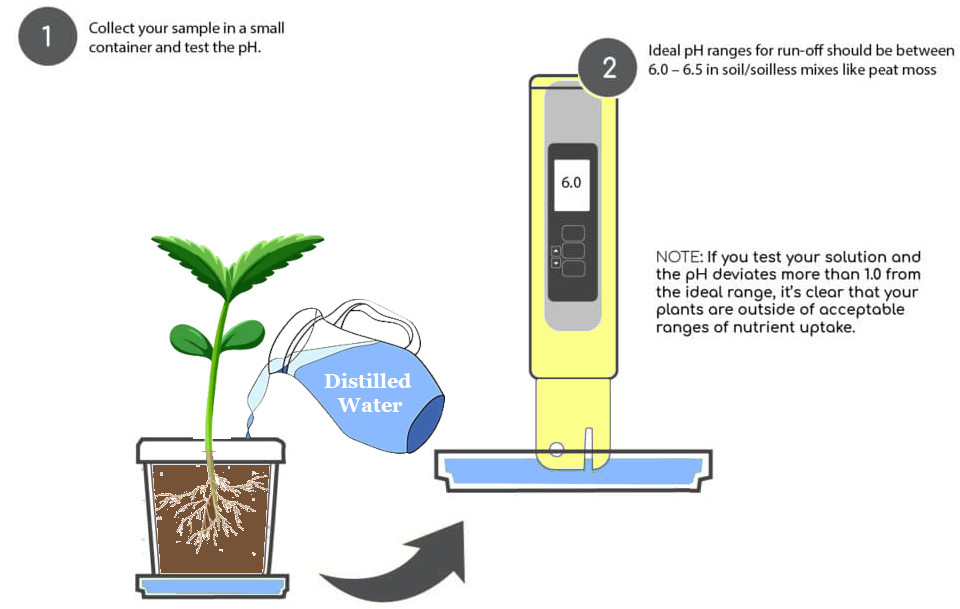
To test the pH of the runoff water, start by watering your plants with plain, neutral water (pH 7.0) until approximately 20% of the water drains out of the bottom of the container. For example, if you water your plants with 1 liter of water, at least 200 milliliters should run out of the container.
Step 2: Collect and Test the Runoff
Collect a sample of the runoff water in a small container and test its pH. The ideal pH range for runoff should be between 6.0 and 6.5 for soil or soilless mixes like peat moss. However, a pH close to this range is generally acceptable.
If the pH of the runoff water deviates more than 1.0 from the ideal range, it indicates that your plants are still experiencing pH-related issues. pH values below 5.5 require further corrective measures to restore the pH balance.
To test the pH of the runoff water, you can use pH testing kits, pH paper, or pH meters specifically designed for testing liquids. Follow the manufacturer’s instructions for accurate readings.
Step 3: Adjust the pH if Necessary
If the pH of the runoff water is still outside the ideal range, you may need to take additional measures to adjust the pH of your soil. Consider repeating the corrective measures mentioned earlier or seek guidance from experts in cannabis cultivation.
Step 4: Maintain Regular pH Monitoring
Continue monitoring the pH levels of your cannabis soil by periodically testing the runoff water. As you make adjustments and maintain the optimal pH range, you will notice healthier growth patterns and a reduction in nutrient deficiencies.
Conclusion
Maintaining the proper pH levels in cannabis soil is crucial for ensuring optimal nutrient uptake and healthy plant growth. By understanding the significance of pH and implementing regular pH testing, you can identify and address any imbalances, creating an ideal environment for your cannabis plants to thrive.
Remember to gather the necessary materials, collect soil samples, prepare soil-water solutions, and test the pH using the appropriate methods. Interpret the results and take corrective measures if needed to restore the pH balance. Regularly monitor the pH levels of your soil through runoff testing to maintain the ideal pH range.
With proper pH management, you can provide your cannabis plants with the best conditions for nutrient absorption, leading to vibrant and healthy growth. Happy cultivating!
Additional Information:
- It’s important to note that different cannabis strains may have slightly different pH preferences. It’s recommended to research and understand the specific pH requirements of the strains you are growing.
- pH fluctuations can be caused by various factors, such as fertilizers, amendments, and water quality. Consider these factors when monitoring and adjusting pH levels in your cannabis soil.

