Embark on a thrilling journey into the world of autoflowering cannabis, where the art of cultivation meets simplicity and speed. If you’re a prospective grower, prepare to be captivated by the sheer ease and rapidity with which these plants grow. For seasoned enthusiasts, get ready to explore a new dimension of cannabis cultivation that promises a harvest in weeks, not months. Autoflowering cannabis plants, with their unique ability to flower independently of light cycles, offer a hassle-free and rewarding experience. In this guide, we invite you to unravel the basics of growing autoflowering cannabis. Get ready to witness the magic of quick growth, vibrant buds, and a cultivation process that’s as exciting as it is straightforward. Let’s dive in and discover the secrets of growing autoflowering cannabis together!
Table of Contents:
1 Week Old Autoflower | Germination and Seedling Stage
2 Week Old Autoflower | Early Vegetative Stage
3 Week Old Autoflower | Vegetative Stage and Pre-Flowering
4 Week Old Autoflower | Early Flowering Stage
5-6 Week Old Autoflower | Mid-Flowering Stage
7-8 Week Old Autoflower | Late Flowering Stage
Harvesting Autoflowers: Ensuring Peak Potency and Flavor
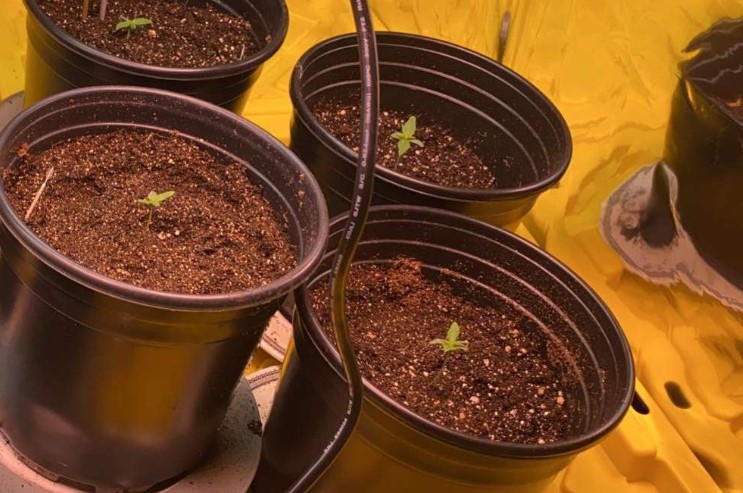
1 WEEK OLD AUTOFLOWER: GERMINATION AND SEEDLING STAGE
Germinating autoflowering cannabis seeds is the first step in growing a healthy and productive plant. Seed selection and preparation, germination methods, seedling care, and light and temperature requirements are all crucial factors in this early stage of growth.
Seed Selection and Preparation
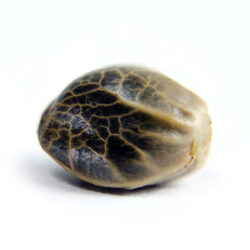
Choosing high-quality autoflowering seeds is the first step to ensuring a successful grow. Look for reputable seed banks or breeders that provide detailed information about their strains, including their genetics, growth patterns, and flowering times. Select seeds that are fresh, plump, and have a hard outer shell, indicating they are viable and ready for germination.
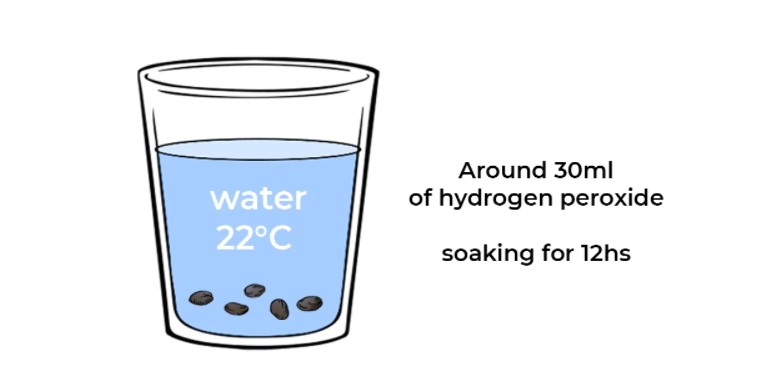
Before planting, you can soak the seeds in water for 12-24 hours to help soften the outer shell and promote germination. Alternatively, you can scarify the seed shell using sandpaper or a knife to make small scratches on the surface. This method will also help water penetrate the seed shell and promote faster germination.
Germination Methods
There are several methods to germinate autoflowering cannabis seeds, including the paper towel method, the direct soil method, and the glass of water method.
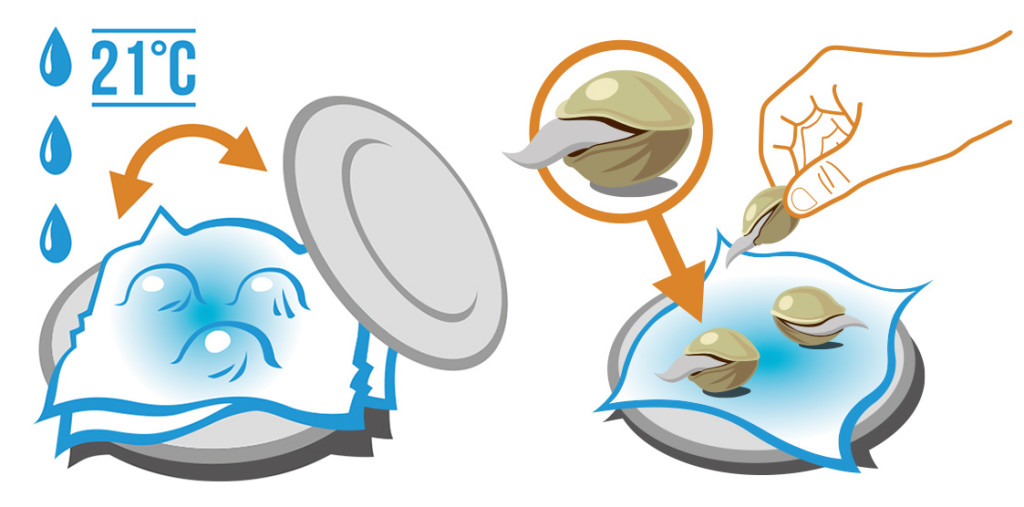
Paper towel method: Soak the seeds in water for 12-24 hours, then place them in between damp paper towels. Keep the towels moist and warm in a dark place, and check on them every day. After 2-5 days, the seeds should sprout, and you can plant them in soil or a hydroponic system.
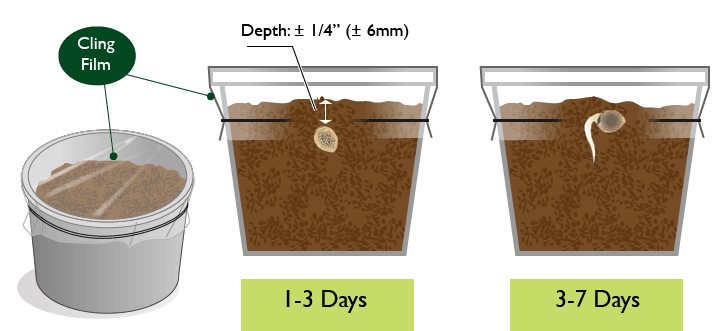
Direct soil method: Place the seeds directly into a small pot or grow medium, making sure to cover them with 1-2 cm of soil. Keep the soil moist and warm in a dark place, and check on them every day. After 2-5 days, the seeds should sprout, and you can move them to a larger pot or grow space.
Glass of water method: Fill a glass with distilled water and place the seeds inside. Keep the glass in a dark place and change the water every day. After 2-5 days, the seeds should sprout, and you can move them to soil or a hydroponic system.
Seedling Care and Nutrient Requirements
Once the seeds have sprouted, they will enter the seedling stage, where they will develop their first leaves and establish their root system. During this stage, it is crucial to provide them with the right conditions and nutrients to ensure healthy growth.
Autoflowering seedlings prefer a mild nutrient solution that contains equal parts of nitrogen, phosphorus, and potassium (NPK). You can use a pre-mixed nutrient solution or create your own using organic fertilizers. Avoid overfeeding the seedlings, as this can lead to nutrient burn and stunted growth.
| Nutrient PPM | Nutrient EC | Soil pH | Hydroponics pH | NPK Ratio |
|---|---|---|---|---|
| 100-250 | 0.2-0.5 | 6.0-6.5 | 5.5-6.0 | 2-1-1 |
During the seedling stage, it’s essential to keep the soil or grow medium moist but not too wet, as this can lead to root rot. Keep the humidity levels between 50-70% and the temperature between 20-25°C to promote healthy growth.
Light and Temperature Requirements
Autoflowering seedlings require 18-24 hours of light per day to promote healthy growth and development. You can use fluorescent or LED grow lights to provide the right amount of light and prevent stretching.
The temperature in the grow space should be between 20-25°C during the seedling stage. Avoid exposing the seedlings to extreme temperatures or cold drafts, as this can stress the plants and slow down their growth.
Troubleshooting Germination and Seedling Stage
The initial stages of an autoflowering cannabis plant’s life are crucial, and challenges may arise during germination and early seedling growth. If you notice weak or frail seedlings, the issue likely stems from the germination process or initial environmental conditions. Here’s how to troubleshoot:
- Inadequate Germination: If seeds don’t sprout, review your germination method. Ensure you’ve used viable seeds and consider adjusting your germination technique for better results, such as using a different method or providing consistent moisture and warmth.
- Weak Seedlings: Frail seedlings may indicate insufficient light, incorrect temperature, or overwatering. Ensure your seedlings receive gentle and adequate light, maintain a stable temperature, and be cautious not to overwater, as it can lead to damping-off disease and weak stems.
- Damping-Off Disease: This fungal disease can affect seedlings, causing them to wilt and collapse. To prevent damping-off, maintain a well-ventilated environment, use sterile soil or growing medium, and avoid overwatering. If damping-off is observed, remove affected seedlings promptly to prevent spreading.
Remember, the key to troubleshooting in the germination and seedling stage lies in providing optimal conditions, including proper light, temperature, and watering practices. Observing your plants closely and making adjustments as needed will significantly enhance their chances of healthy growth.
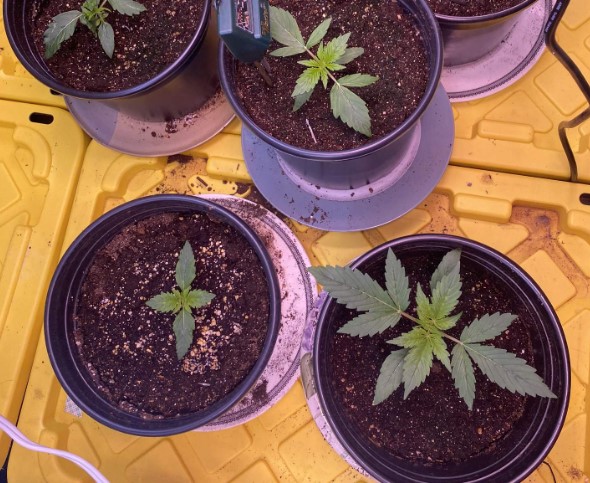
2 WEEK OLD AUTOFLOWER : EARLY VEGETATIVE STAGE
Week 2 is an important period for autoflowering cannabis plants, as they start to establish their vegetative growth and develop their stem and leaf structure. Understanding the growth patterns, nutrient requirements, training techniques, and light and temperature requirements during this stage can help ensure healthy growth and increase yield potential.
Growth Patterns and Characteristics
During the early vegetative stage, autoflowering cannabis plants will start to develop their stem and leaf structure. They will also start to grow rapidly, and their roots will start to spread out in search of nutrients and water.
At this stage, the plants will be around 5-10 cm tall and will have developed 2-4 sets of true leaves. The stem will also start to thicken, and the plants will become more stable.
Nutrient Requirements and Feeding Schedule
| Nutrient PPM | Nutrient EC | Soil pH | Hydroponics pH | NPK Ratio |
|---|---|---|---|---|
| 300-400 | 0.6-0.8 | 6.0-6.5 | 5.5-6.0 | 3-1-2 |
Autoflowering cannabis plants have specific nutrient requirements during the vegetative stage. They need higher levels of nitrogen (N) to promote healthy leaf growth and stem development. You can use a balanced NPK fertilizer with a higher N ratio to feed your plants during this stage.
It’s important to avoid overfeeding the plants, as this can lead to nutrient burn and other nutrient-related issues. Start with a mild nutrient solution and gradually increase the dosage as the plants grow and develop.
A typical feeding schedule during the early vegetative stage is to feed the plants every 2-3 days. You can adjust the frequency based on the growth rate and the moisture level of the soil or grow medium.
Light and Temperature Requirements
During the early vegetative stage, autoflowering cannabis plants require 18-24 hours of light per day. You can use fluorescent or LED grow lights to provide the right amount of light and prevent stretching.
The temperature in the grow space should be between 20-25°C during the early vegetative stage. Avoid exposing the plants to extreme temperatures or drafts, as this can stress the plants and slow down their growth.
Troubleshooting Vegetative Stage
- Stunted Growth:
- Cause: Stunted growth can result from insufficient light, incorrect pH levels, or poor-quality soil.
- Solution: Increase the light intensity and duration, ensuring the plants receive at least 18 hours of light per day. Check the pH of the soil or growing medium; an optimal range between 6.0-6.5 promotes nutrient absorption. Consider repotting into high-quality, well-draining soil if the current medium seems inadequate.
- Yellowing Leaves:
- Cause: Yellowing leaves, especially lower ones, often indicate a nitrogen deficiency.
- Solution: Provide a balanced fertilizer with a higher nitrogen (N) ratio to promote healthy leaf development. Avoid overfeeding, as it can cause nutrient burn. Ensure proper drainage to prevent waterlogged roots, which can lead to nutrient deficiencies.
- Wilting or Drooping Leaves:
- Cause: Wilting can occur due to underwatering, overwatering, or inadequate root development.
- Solution: Check the moisture levels in the soil. If it’s too dry, increase watering frequency, but ensure proper drainage to avoid water accumulation. If overwatering is suspected, reduce watering and allow the soil to dry out slightly between waterings. Consider transplanting if roots are restricted, allowing the plant more space to grow.
- Pest Infestations:
- Cause: Insects like aphids and spider mites can attack young plants, causing wilting and distorted growth.
- Solution: Introduce natural predators like ladybugs or use organic insecticidal soap to deter pests. Regularly inspect the undersides of leaves where pests often hide. Isolate affected plants to prevent the infestation from spreading.
3 WEEK OLD AUTOFLOWER | VEGETATIVE STAGE AND PRE-FLOWERING
During week 3 of the autoflowering cannabis plant’s life cycle, the plants will continue to grow and develop more leaves and branches. They will also become more mature and show significant signs of pre-flowering. This stage is critical for ensuring that your plants have enough nutrients to support the upcoming flowering stage.
Growth Patterns and Characteristics:
- The plants will continue to grow in height and produce more leaves and branches.
- The plants will begin to show significant signs of pre-flowering, including the development of small white pistils and calyxes.
Nutrient Requirements and Feeding Schedule:
| Nutrient PPM | Nutrient EC | Soil pH | Hydroponics pH | NPK Ratio |
|---|---|---|---|---|
| 500-700 | 1.0-1.4 | 6.0-6.5 | 5.5-6.0 | 3-2-4 |
- At this stage, it’s recommended to switch from a vegetative nutrient formula to a flowering nutrient formula, which contains lower levels of nitrogen and higher levels of phosphorus and potassium to promote bud development and flowering.
- Be sure to follow the manufacturer’s feeding schedule and guidelines, as overfeeding or underfeeding can lead to nutrient deficiencies or toxicities.
- It’s essential to monitor your plants closely during this stage to ensure they’re getting the right balance of nutrients.
Training Techniques (LST, Topping, FIM):
Training Techniques for Autoflower Plants
Autoflower plants can benefit from various training techniques to optimize their growth and yield potential. Here are some of the most popular methods:
Low Stress Training (LST)
LST involves gently bending the branches of your plant to create a more even canopy and increase light exposure to lower parts of the plant. To perform LST on your autoflower plant:
- Wait until your plant has a few sets of leaves and is strong enough to handle the stress.
- Use soft wire or plant ties to gently bend the branches down and away from the center of the plant.
- Keep an eye on the plant and adjust the ties as necessary to maintain the desired shape.
- Repeat the process as necessary throughout the vegetative stage.
Topping
Topping is the process of removing the top part of the main stem to encourage more lateral growth and increase the number of colas (flowering sites). To top your autoflower plant:
- Wait until your plant has at least 4-5 nodes (sets of leaves).
- Using sharp, sterilized scissors, cut off the top of the main stem just above the 4th or 5th node.
- Allow the plant to recover for a few days before resuming normal care.
- As the plant grows, train the new lateral branches using LST techniques to create a bushier plant.
FIM (F*ck, I Missed)
FIM is a technique similar to topping but involves only partially cutting off the top of the main stem. This method can encourage even more lateral growth than topping. To FIM your autoflower plant:
- Wait until your plant has at least 4-5 nodes (sets of leaves).
- Using sharp, sterilized scissors, cut off the top of the main stem just above the 4th or 5th node, leaving a small portion of the top intact.
- Allow the plant to recover for a few days before resuming normal care.
- As the plant grows, train the new lateral branches using LST techniques to create a bushier plant.
Super Cropping
Super cropping involves intentionally stressing the branches of your plant to encourage stronger, thicker growth and increase yields. To super crop your autoflower plant:
- Wait until your plant has developed strong stems and branches.
- Using your fingers, gently squeeze the branches until they become pliable and can be bent.
- Bend the branches in the desired direction and hold in place with plant ties or soft wire.
- Allow the plant to recover for a few days before resuming normal care.
Remember, it’s important to be gentle and patient when training your autoflower plant, as they have a shorter life cycle and may not recover as quickly as photoperiod plants.
Light and Temperature Requirements:
- During this stage, your plants will require at least 18-20 hours of light per day to ensure optimal growth and development.
- The ideal temperature range for this stage is between 70-85°F (21-29°C) during the day and 60-70°F (15-21°C) at night.
- Be sure to monitor the humidity levels in your grow space, as high humidity can increase the risk of mold and mildew.
Troubleshooting Flowering Stage of Autoflowers
- Stretching and Spindly Growth:
- Cause: Stretching occurs when plants don’t receive enough light, leading them to elongate in search of it.
- Solution: Increase the light intensity and bring the light source closer to the plants. Consider low-stress training (LST) techniques to encourage lateral growth and discourage upward stretching.
- Nutrient Deficiencies or Imbalances:
- Cause: Yellowing leaves, especially during early flowering, could indicate nutrient deficiencies or imbalances.
- Solution: Check the pH levels of your growing medium; an incorrect pH can affect nutrient uptake. Provide a balanced fertilizer with higher phosphorus (P) and potassium (K) content to support flowering. Avoid overfeeding, as it can lead to nutrient burn. Flush the plants with plain, pH-balanced water if you suspect nutrient buildup in the soil.
- Early Bud Rot or Mold:
- Cause: High humidity levels and poor ventilation can lead to bud rot or mold, especially in the early flowering stage.
- Solution: Maintain adequate airflow and ventilation in your grow space to prevent humidity buildup. Consider using a dehumidifier if necessary. Regularly inspect buds for any signs of rot or mold, removing affected areas promptly to prevent spreading.
- Nutrient Burn:
- Cause: Excessive nutrient levels can cause nutrient burn, leading to yellow or burnt leaf tips and edges.
- Solution: Reduce the strength of your nutrient solution. It’s better to start with milder doses and gradually increase if necessary. Monitor your plants for signs of recovery.
- Wilting or Drooping Buds:
- Cause: Improper watering practices, nutrient deficiencies, or root problems can lead to wilting buds.
- Solution: Check the moisture levels in the soil and adjust your watering schedule if needed. Inspect the roots for signs of rot or pests. Ensure proper drainage and consider adding beneficial microbes to enhance root health.
- Bud Rot and Mold:
- Cause: Humid conditions and poor airflow around the buds can invite mold and bud rot.
- Solution: Maintain low humidity levels and improve ventilation. Prune fan leaves to enhance airflow to the lower buds. Regularly inspect buds for any signs of rot, removing affected parts immediately.
- Yellowing or Browning Pistils:
- Cause: Prematurely yellowing or browning pistils can indicate stress, nutrient deficiencies, or overripening.
- Solution: Address the underlying cause of stress, ensuring proper lighting, nutrients, and environmental conditions. Harvest mature buds on time to prevent overripening.
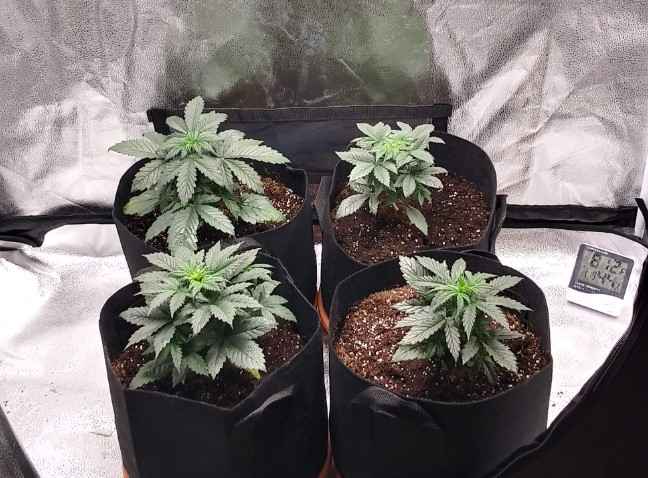
4 WEEK OLD AUTOFLOWER | EARLY FLOWERING STAGE
At four weeks old, your autoflower plant should be in the early flowering stage. During this phase, your plant will shift its focus from growing new leaves and stems to developing buds. Here are some things to keep in mind during this stage:
Growth Patterns and Characteristics
- The plant will begin to form small buds at the nodes of its branches
- The leaves may begin to yellow and fall off as the plant redirects energy to bud development
- The plant may stretch slightly as it continues to grow upward
Nutrient Requirements and Feeding Schedule
| Nutrient PPM | Nutrient EC | Soil pH | Hydroponics pH | NPK Ratio |
|---|---|---|---|---|
| 700-900 | 1.4-1.8 | 6.0-6.5 | 5.5-6.0 | 1-4-4 |
- During the early flowering stage, your plant will require more phosphorus and potassium to support bud development. Look for a fertilizer with a higher middle number (e.g. 5-10-5).
- Avoid using nitrogen-heavy fertilizers at this stage, as they can inhibit bud growth.
Light and Temperature Requirements
- Your plant will still need 18-20 hours of light per day to continue growing and developing buds. If you are growing indoors, you may want to switch to light with a higher proportion of red wavelengths to encourage bud development.
- Keep the temperature around 70-75°F (21-24°C) during the day and around 65-70°F (18-21°C) at night to ensure optimal growth and prevent heat stress.
Flowering Stages and Development
- During the early flowering stage, the buds will begin to swell and become more aromatic.
- It’s important to keep an eye out for any signs of stress or nutrient deficiencies during this stage, as they can impact bud development and overall yield.
Remember, every plant is unique and may develop at a slightly different pace. Keep a close eye on your plant’s growth and adjust your care regimen as needed to ensure the best possible outcome.
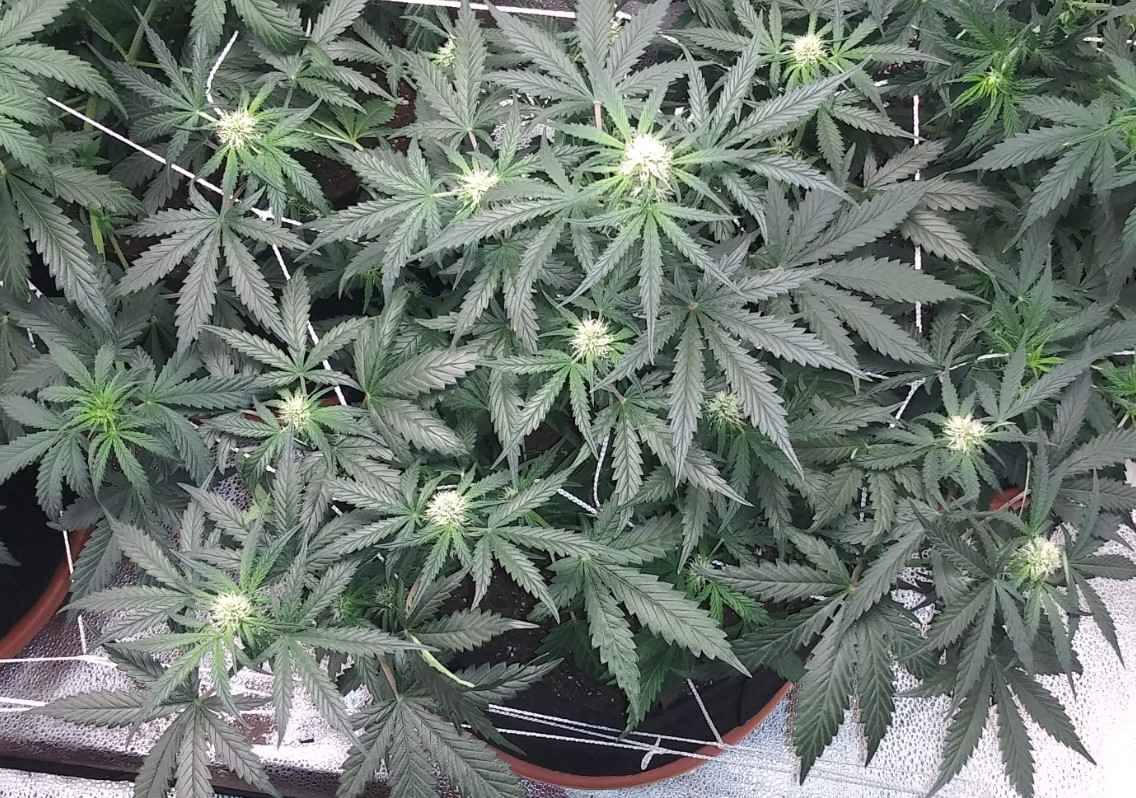
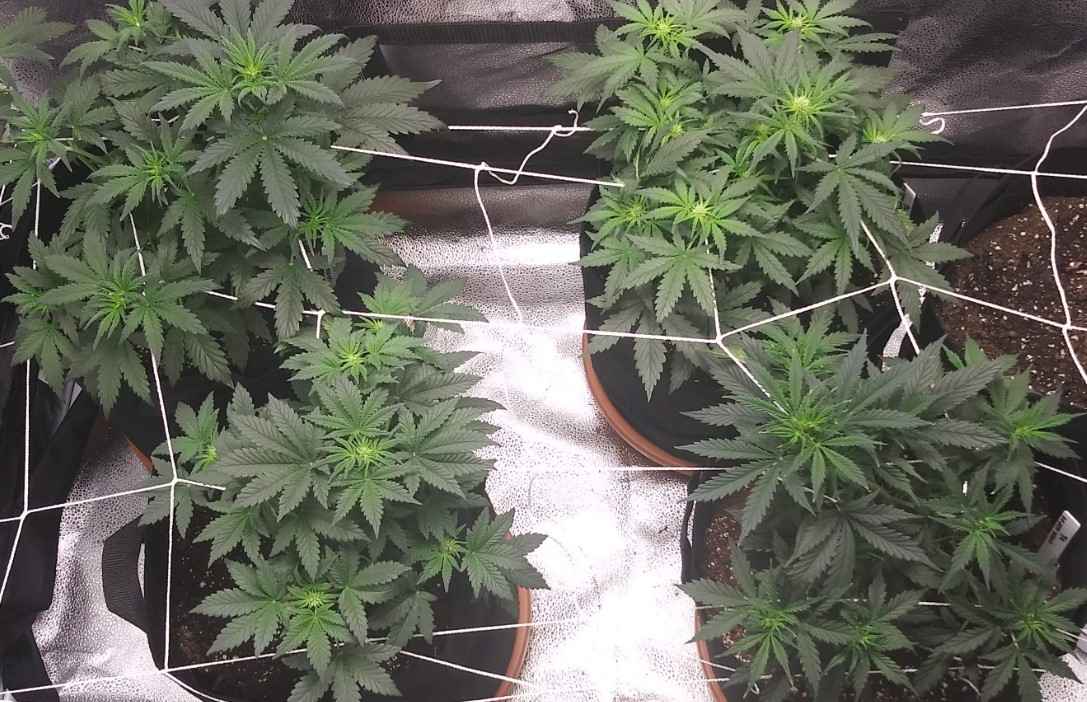
5-6 WEEK OLD AUTOFLOWER | MID-FLOWERING STAGE
Growth Patterns and Characteristics
During the mid-flowering stage, the plant’s focus will shift toward producing buds. The buds will begin to increase in size and density, and the plant will continue to grow taller. At this stage, the plant may require some support to prevent it from bending or breaking under the weight of the buds.
Nutrient Requirements and Feeding Schedule
| Nutrient PPM | Nutrient EC | Soil pH | Hydroponics pH | NPK Ratio |
|---|---|---|---|---|
| 900-1100 | 1.8-2.2 | 6.0-6.5 | 5.5-6.0 | 1-5-5 |
During the mid-flowering stage, it is essential to provide the plant with the nutrients it needs to support healthy bud development. It is recommended to continue using bloom nutrients, which are high in phosphorus and potassium. Be sure to follow the manufacturer’s instructions and adjust the feeding schedule as needed based on the plant’s response.
Light and Temperature Requirements
Autoflower plants require consistent lighting and temperature conditions throughout their entire lifecycle. It is important to maintain a temperature range of 70-85°F (21-29°C) and provide 18-24 hours of light per day during the mid-flowering stage. High humidity levels can increase the risk of mold and mildew, so it is important to maintain proper ventilation and airflow.
Managing Height and Canopy Control
During the mid-flowering stage, the plant may continue to grow taller and produce more buds. To prevent the plant from becoming too tall and to encourage the growth of lower buds, you can use techniques such as low-stress training (LST) or defoliation. Be careful not to damage the plant during these processes, as this can slow down growth and development. Additionally, it is important to monitor the plant for signs of nutrient deficiencies or pests and address any issues promptly to ensure healthy growth and development.
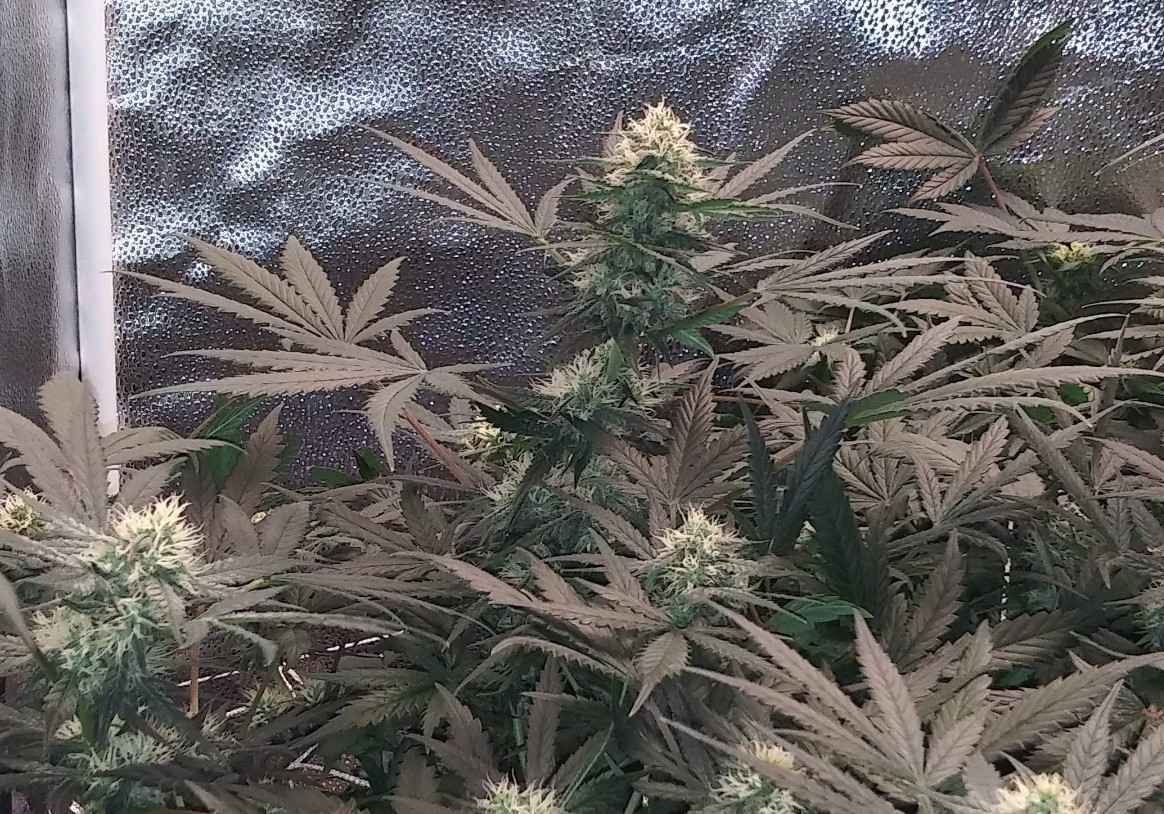
7-8 WEEK OLD AUTOFLOWER | LATE FLOWERING STAGE
Growth Patterns and Characteristics:
During this stage, the plant will continue to produce buds and the flowers will become more dense and resinous. The buds will start to ripen and the pistils will begin to change color, usually from white to amber. The plant may also start to emit a strong odor as the resin production increases.
Nutrient Requirements and Feeding Schedule:
| Nutrient PPM | Nutrient EC | Soil pH | Hydroponics pH | NPK Ratio |
|---|---|---|---|---|
| 1100-1300 | 2.2-2.6 | 6.0-6.5 | 5.5-6.0 | 1-6-6 |
At this stage, the plant will require less nitrogen and more phosphorus and potassium. It’s recommended to switch to a bloom nutrient with a higher PK ratio to support the development of the flowers. Be sure to monitor the pH and adjust as needed to ensure optimal nutrient uptake.
Light and Temperature Requirements:
The plant will still need 18-24 hours of light per day, but some growers choose to decrease the light cycle to 12 hours per day during the final weeks of flowering to promote resin production. Keep the temperature and humidity levels consistent and avoid any drastic changes, as this can stress the plant and affect the quality of the buds.
Harvesting Autoflowers: Ensuring Peak Potency and Flavor
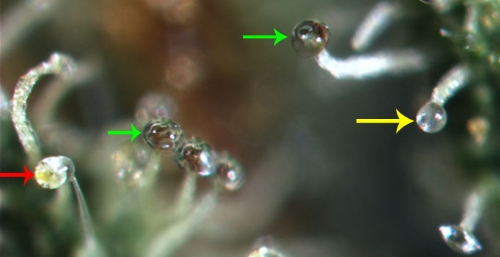
Clear Trichomes: Harvesting at this stage provides a more cerebral high.
Cloudy Trichomes: This stage offers a balanced effect between cerebral and relaxing highs.
Amber Trichomes: Harvesting at this stage yields a more relaxing high but may result in lower THC content.
Experimentation is key. Cut a bud at different stages near the predicted harvest time and test them to find your desired effect. Many growers prefer harvesting when most trichomes are cloudy for a balanced high.
Knowing the optimal moment to harvest your autoflowering cannabis plants is crucial for achieving the desired potency, flavor, and overall quality of your yield. Proper timing, techniques, and care during this phase significantly enhance the user experience. Here’s a comprehensive guide on how to harvest and cure your autoflowers for optimal results:
Checking Trichomes for Harvest Readiness:
Before you begin the harvest, it’s essential to assess the trichomes on your cannabis buds. Inspect the trichomes using a magnifier or jeweler’s loop. Trichomes are the tiny, resinous glands that contain cannabinoids. At the peak of their development, they transition from Clear Trichomes to Cloudy Trichomes. If left long enough the trichomes will turm amber in color.
Harvesting Your Cannabis Plants:
When it comes to harvesting, a methodical approach can significantly impact your plant’s quality. Instead of cutting all the buds at once, consider harvesting one plant at a time. Cut the plant a few centimeters above the ground. Remove large leaves without tearing off the leaf stems, primarily for aesthetic and practical reasons. Tidying up the buds makes for easier handling and trimming during the curing process.
You can further refine your buds by trimming medium and small-sized leaves with scissors. After trimming, hang the plant upside down in your drying room. Ensure the buds don’t touch each other to prevent mold growth. Proper ventilation, low humidity, and darkness in the drying room are crucial. It will take around two weeks for your marijuana to dry completely under these conditions.
Drying and Curing Your Cannabis Plants:
Proper drying and curing refine the aroma, flavor, and smoothness of your cannabis. After harvest, hang your trimmed cannabis plants upside down in a dark, well-ventilated room. Maintain low humidity and ensure adequate airflow for about two weeks until the buds are crisp outside but slightly moist inside.
Next, move the dried buds to airtight glass jars. Open the jars once a day for the first week to release excess moisture. During curing, the flavors will mature, and the harshness will diminish. Cure your cannabis for a minimum of two to four weeks to achieve the best results.
Mastering the art of harvesting and curing is essential for producing top-quality autoflowering cannabis. By following these guidelines and experimenting with different methods, you can achieve a harvest that delivers a delightful and potent cannabis experience. Happy growing!