Welcome to the world of innovative and hassle-free cannabis cultivation with AutoPot systems! For both seasoned growers and those venturing into the realm of cultivating the green herb, AutoPot offers a revolutionary approach to watering that combines efficiency with simplicity. Imagine a self-watering system that tailors itself to your plants’ needs, ensuring they receive the perfect amount of hydration without the risk of overwatering. In this comprehensive guide, we’ll delve into the workings of AutoPot, explore the steps to set up your system, troubleshoot common issues, and unlock the secrets to optimizing your cannabis harvest. Get ready to transform your cultivation experience as we unravel everything you need to know to harness the full potential of AutoPot for growing cannabis effectively. Your journey to bountiful and stress-free harvests begins here!
1. Overview
1.1 Overview of AutoPot Systems
1.2 Benefits of Using AutoPot for Cannabis Cultivation
2. How AutoPot Works
2.1 Aqua-Valve Technology
2.2 Gravity-Based Watering System
2.3 Components of an AutoPot System
3. Setting Up Your AutoPot System
3.1 Choosing the Right AutoPot System for Your Cannabis Grow
3.2 Installation Steps
3.3 Adjusting Watering Schedules
4. Flushing an AutoPot System
4.1 Importance of Flushing
4.2 Step-by-Step Guide to Flushing
4.3 Tips for Effective System Cleaning
5. Transitioning Seedlings to AutoPot
5.1 Ideal Seedling Stage for AutoPot
5.2 Transplanting Seedlings into AutoPot
5.3 Adjusting Nutrient Levels for Seedlings
6. Troubleshooting Common Issues
6.1 Dealing with Blockages in the System
6.2 Addressing pH Imbalances
6.3 Recognizing and Resolving Overwatering or Underwatering
7. Optimizing Cannabis Growth with AutoPot
7.1 Nutrient Recommendations
7.2 Light and Environmental Considerations
7.3 Training Techniques for AutoPot Grown Cannabis
8. Final Tips for Successful Cannabis Cultivation with AutoPot
1. Overview
1.1 Overview of AutoPot Systems:
AutoPot systems represent a paradigm shift in the way we approach plant hydration, especially in the context of cannabis cultivation. Developed with simplicity and efficiency in mind, AutoPot utilizes Aqua-Valve Technology, a cutting-edge mechanism that harnesses the power of gravity to deliver precise amounts of water directly to your plants’ root systems. Unlike traditional irrigation methods, AutoPot systems eliminate the need for pumps and electricity, making them not only eco-friendly but also remarkably cost-effective.
With a focus on providing a self-sufficient watering solution, AutoPot systems are designed to adapt to the specific needs of your cannabis plants throughout their growth stages. This hands-off approach allows growers to spend less time worrying about watering schedules and more time observing the flourishing development of their prized cannabis crops.
1.2 Benefits of Using AutoPot for Cannabis Cultivation:
The advantages of incorporating AutoPot into your cannabis cultivation endeavors are as abundant as the harvests it helps produce. One of the standout benefits is the prevention of overwatering, a common pitfall in traditional cultivation methods. AutoPot’s Aqua-Valve ensures that your plants receive water precisely when they need it, promoting optimal nutrient absorption and root development.
Furthermore, the system’s simplicity extends to its versatility. Whether you’re cultivating cannabis indoors or embracing the natural elements of an outdoor garden, AutoPot seamlessly adapts to various environments, providing a consistent and reliable watering solution. As we embark on this exploration of AutoPot systems, anticipate discovering a world where efficiency meets innovation, promising not just ease of use, but a quantum leap in the quality and quantity of your cannabis harvests.
2. How AutoPot Works
In this section, we’ll unravel the inner workings of AutoPot systems, breaking down the technology that sets them apart and exploring the fundamental principles that make them a game-changer in cannabis cultivation.
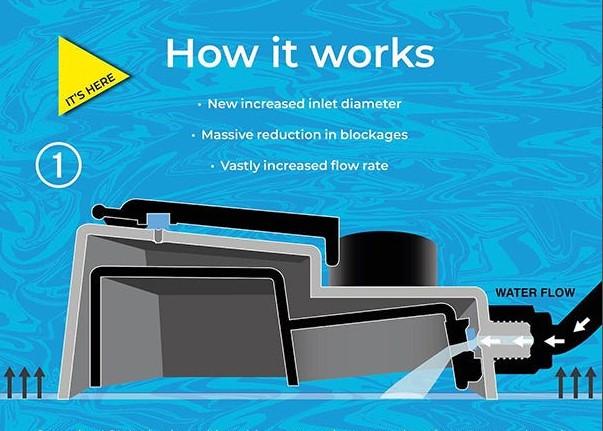
2.1 Aqua-Valve Technology:
At the heart of every AutoPot system lies the Aqua-Valve, a sophisticated yet elegantly simple piece of technology that distinguishes AutoPot from traditional watering methods. The Aqua-Valve operates as an automatic valve that precisely controls the flow of water to your plants. It functions by responding to the water needs of each individual pot, ensuring that the plants receive moisture only when required.
This innovative technology works in conjunction with the natural tension of the growing medium. When the growing medium dries out, the Aqua-Valve opens, allowing water to flow into the pot until the desired moisture level is reached. Once the soil or substrate is adequately hydrated, the valve closes, preventing overwatering and conserving water resources. This intelligent mechanism not only promotes water efficiency but also facilitates optimal nutrient uptake by the plants, contributing to healthier and more robust growth.
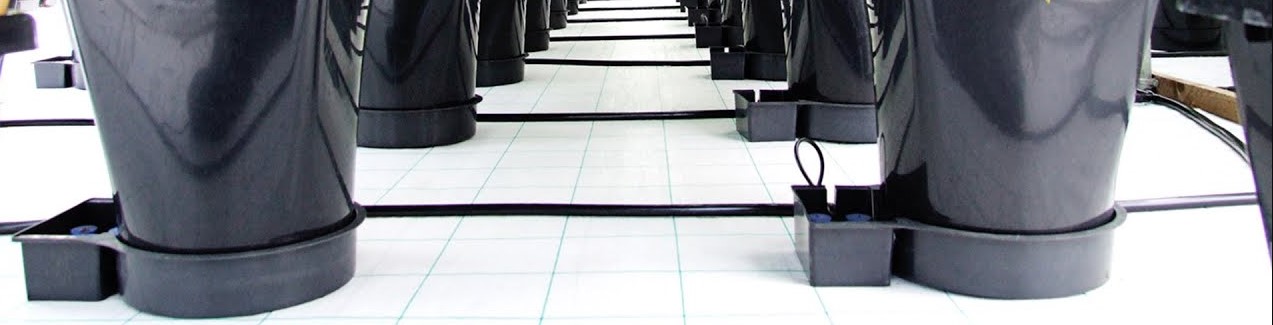
2.2 Gravity-Based Watering System:
AutoPot takes advantage of the reliable force of gravity to deliver water to your plants. Unlike systems that rely on electric pumps, the gravity-based approach simplifies the setup, making AutoPot systems accessible and user-friendly. As water moves from the elevated reservoir through the tubing to the Aqua-Valve, it capitalizes on gravity’s natural pull, ensuring a consistent and reliable distribution of water to each pot in the system.
This gravity-fed mechanism not only eliminates the need for complex and energy-consuming pumping systems but also enhances the overall reliability of the AutoPot setup. It’s a low-maintenance solution that allows growers to focus more on the cultivation process itself, confident that their plants are receiving precisely the right amount of water without any manual intervention.
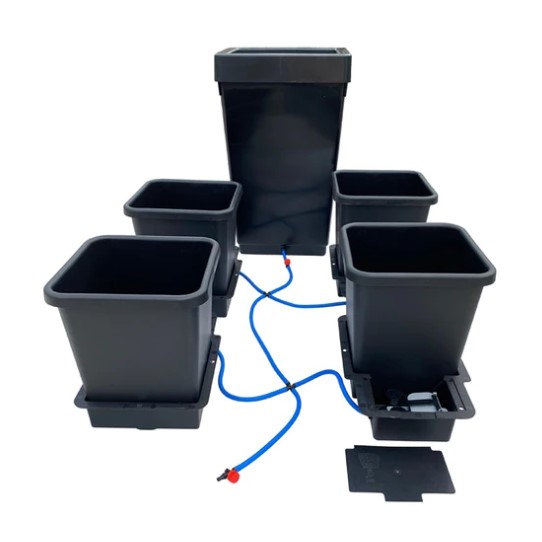
2.3 Components of an AutoPot System:
Understanding the components of an AutoPot system is essential for successful implementation. Each part plays a crucial role in creating a self-regulating, gravity-based watering system. Here’s a brief overview of the key components:
- Reservoir: The water reservoir is where your nutrient solution is stored. It’s positioned above the plants to take advantage of gravity.
- Aqua-Valve: This is the intelligent valve that controls the water flow. It opens and closes based on the moisture level in the growing medium.
- Tubing: Durable tubing connects the reservoir to the Aqua-Valve, allowing water to flow through the system.
- Growing Medium: Plants are placed in pots filled with a chosen growing medium, such as soil or coco coir.
- Tray and Pots: The trays and pots hold the plants and growing medium, facilitating a neat and organized setup.
By understanding the roles of these components, growers can assemble and maintain an AutoPot system effectively, setting the stage for a thriving cannabis cultivation experience.
3. Setting Up Your AutoPot System
Embarking on a successful cannabis cultivation journey with AutoPot begins with the proper setup of your system. This section will guide you through the crucial steps, from selecting the right AutoPot system for your needs to the installation process and fine-tuning watering schedules for optimal plant health.
3.1 Choosing the Right AutoPot System for Your Cannabis Grow:
Selecting the appropriate AutoPot system is a pivotal decision that directly influences the success of your cannabis cultivation. Consider the following factors when making this choice:
- Size of Grow Space: Determine the size of your grow space, whether it’s a small indoor tent or a more extensive outdoor garden. AutoPot offers various system sizes to accommodate different cultivation environments.
- Number of Plants: The number of plants you intend to grow will influence the size and configuration of the AutoPot system you choose. Ensure that the system’s capacity aligns with your cultivation goals.
- Grow Medium: Consider the type of growing medium you prefer, as this may impact the specific AutoPot system model you need. AutoPot systems are versatile and can work with various substrates, including soil, coco coir, and more.
- Water Source: Assess the availability and quality of your water source. Depending on your location, you might need to incorporate additional filtration or conditioning systems to ensure the nutrient solution is optimal for your plants.
3.2 Installation Steps:
Once you’ve chosen the right AutoPot system for your cannabis grow, it’s time to set it up. Follow these step-by-step installation instructions to ensure a smooth and efficient setup process:
- Positioning the Reservoir: Place the water reservoir above the plants, ensuring it’s elevated to allow gravity to assist in the watering process.
- Connecting the Tubing: Attach the tubing from the reservoir to the Aqua-Valve, securing it firmly to prevent leaks. Ensure a gentle downward slope for proper water flow.
- Arranging Pots and Trays: Position the pots and trays in your grow space, arranging them to optimize space and allow for easy access. Fill the pots with your chosen growing medium.
- Filling the Reservoir: Add the nutrient solution to the reservoir, taking care to mix it according to the recommended ratios. Allow the system to run briefly to flush out any air bubbles.
- Activating the System: Once everything is set up, activate the system and observe the water flow to confirm that each pot is receiving water as intended.
3.3 Adjusting Watering Schedules:
Fine-tuning the watering schedule is a crucial aspect of maximizing the benefits of your AutoPot system. Consider the following factors when adjusting watering schedules:
- Plant Growth Stage: Different stages of plant growth require varying levels of water. Adjust the watering frequency and duration based on whether your plants are in the seedling, vegetative, or flowering stage.
- Environmental Conditions: Factors such as temperature and humidity can influence water consumption. Monitor environmental conditions and make adjustments to the watering schedule as needed.
- Plant-Specific Needs: Pay attention to individual plant requirements. Some plants may have different water needs than others, even within the same system.
- Nutrient Solution Strength: Adjust the strength of the nutrient solution based on your plants’ nutrient requirements. A well-balanced nutrient solution is crucial for optimal growth.
By carefully considering these factors and regularly monitoring your plants, you can fine-tune the AutoPot system’s watering schedule to ensure your cannabis crops thrive throughout their lifecycle.
4. Flushing an AutoPot System
Maintaining a healthy and productive cannabis crop with your AutoPot system involves periodic flushing to remove accumulated salts and ensure optimal nutrient absorption. In this section, we’ll explore the importance of flushing, provide a step-by-step guide, and share tips for effective cleaning to keep your system running smoothly.
4.1 Importance of Flushing:
Flushing is a critical practice in cannabis cultivation, and it holds particular significance in the context of AutoPot systems. Over time, nutrient salts can accumulate in the growing medium, potentially leading to imbalances that hinder plant growth. Flushing serves several essential purposes:
- Salt Removal: Flushing helps remove excess salts that may have built up in the growing medium, preventing nutrient lockout and ensuring your plants can access essential elements.
- pH Stabilization: It aids in stabilizing the pH levels of the growing medium, promoting an environment conducive to nutrient absorption.
- Preventing Buildup: Flushing prevents the buildup of residues within the system components, such as tubing and the Aqua-Valve, maintaining optimal functionality.
- Refreshing the Medium: By flushing the growing medium, you refresh the substrate, providing a clean and nutrient-rich environment for your plants.
4.2 Step-by-Step Guide to Flushing:
Follow these steps to perform an effective flush for your AutoPot system:
- Prepare Flushing Solution: Create a flushing solution by using pH-balanced water. Ensure the water is free from any added nutrients.
- Empty Reservoir: Drain the nutrient solution from the reservoir and replace it with the flushing solution.
- Activate System: Run the system with the flushing solution for a sufficient duration, allowing it to thoroughly irrigate the growing medium and flush out accumulated salts.
- Monitor Runoff: Position trays beneath the pots to collect runoff water. Monitor the runoff’s electrical conductivity (EC) and pH levels to gauge the effectiveness of the flush.
- Repeat if Necessary: If the runoff still indicates high salt levels, repeat the flushing process until the EC and pH levels stabilize within the desired range.
- Refill with Nutrient Solution: Once the flush is complete, drain the flushing solution and refill the reservoir with a well-balanced nutrient solution suitable for your plants’ growth stage.
4.3 Tips for Effective System Cleaning:
In addition to flushing, regular cleaning of the AutoPot system components ensures longevity and optimal performance. Consider the following tips:
- Inspect Tubing: Regularly inspect and clean the tubing to prevent clogs or blockages. Remove any debris or sediment that may accumulate over time.
- Check Aqua-Valve: Examine the Aqua-Valve for any mineral deposits or residue. Clean it thoroughly to maintain its functionality.
- Clean Pots and Trays: Periodically clean the pots and trays to prevent the buildup of salts and ensure a hygienic environment for plant growth.
- Sterilize Reservoir: Empty and sterilize the reservoir between crops to eliminate any potential pathogens or contaminants.
By incorporating regular flushing and cleaning into your maintenance routine, you’ll uphold the efficiency and reliability of your AutoPot system, providing your cannabis plants with the optimal conditions they need to thrive.

5. Transitioning Seedlings to AutoPot
Successfully transitioning seedlings to an AutoPot system involves careful consideration of specific growth indicators. In this section, we’ll delve into the ideal seedling stage for AutoPot, guide you through the transplanting process, and provide insights on adjusting nutrient levels to support robust seedling development.
5.1 Ideal Seedling Stage for AutoPot:
Timing is crucial when transitioning seedlings to an AutoPot system. The ideal conditions for transitioning seedlings include:
- Root Development: Wait until seedlings have developed a well-established root system, typically with roots extending at least 2 inches in length.
- Leaf and Stem Growth: Seedlings should exhibit robust leaf and stem growth, with a minimum of two to three sets of true leaves.
- Height: Transition seedlings to the AutoPot system when they reach a height of approximately 4 to 6 inches. This height ensures that the plants can take full advantage of the watering system without being overwhelmed.
5.2 Transplanting Seedlings into AutoPot:
Follow these specific steps for a smooth transition of seedlings into your AutoPot system:
- Prepare Pots and Medium: Ensure that the pots are filled with a suitable growing medium, and place them in the trays of the AutoPot system.
- Water Seedlings: Thoroughly water the seedlings in their existing containers before transplanting to minimize stress during the transition.
- Gently Remove Seedlings: Carefully remove the seedlings from their current containers, taking care not to disturb the roots excessively.
- Plant in AutoPot System: Plant the seedlings in the prepared pots within the AutoPot system. Ensure the root system is spread out evenly and covered with the growing medium.
- Watering Adjustment: Initially, manually water the seedlings in the AutoPot system to help them acclimate. Gradually reduce manual watering as the Aqua-Valve takes over.
- Monitor and Adjust: Keep a close eye on the seedlings during the first few days in the AutoPot system. Adjust the watering schedule if needed to accommodate the specific needs of the transitioning plants.
5.3 Adjusting Nutrient Levels for Seedlings:
Seedlings have different nutrient requirements compared to mature plants. Consider the following tips when adjusting nutrient levels for seedlings in your AutoPot system:
- Start with Diluted Nutrients: Begin with a nutrient solution that is 25-50% of the strength recommended for mature plants. This helps prevent overfeeding and minimizes the risk of nutrient burn.
- Monitor Plant Response: Pay close attention to the seedlings’ response to the initial nutrient solution. Adjust nutrient levels based on visual cues, such as leaf color and overall plant health.
- Gradual Increase: Gradually increase the nutrient concentration as the seedlings grow and develop. This allows them to adapt to the increasing nutrient availability provided by the AutoPot system.
6. Troubleshooting Common Issues
Despite the efficiency of AutoPot systems, occasional challenges may arise during the cultivation process. This section focuses on identifying and addressing common issues to ensure the continuous health and productivity of your cannabis plants.
6.1 Dealing with Blockages in the System:
Blockages in the AutoPot system can disrupt the smooth flow of water and nutrients to your plants. Follow these steps to effectively deal with blockages:
- Inspect Tubing: Regularly check the tubing for any obstructions or kinks. Clear any debris or sediment that may accumulate over time.
- Clean Aqua-Valve: Examine the Aqua-Valve for mineral deposits or residue. Detach the valve and clean it thoroughly to maintain optimal functionality.
- Flush the System: If blockages persist, perform a system flush using clean, pH-balanced water. This can help dislodge and remove any accumulated particles.
- Preventative Measures: Consider using a pre-filter or sediment filter in the water reservoir to reduce the likelihood of blockages caused by debris.
6.2 Addressing pH Imbalances:
Maintaining the correct pH level is crucial for nutrient absorption and overall plant health. If you observe pH imbalances in your AutoPot system, take the following steps:
- Monitor pH Regularly: Use a pH meter to monitor the pH levels of both the nutrient solution and runoff. Check and adjust the pH weekly or as needed.
- Adjust Nutrient Solution: If pH levels are too high or too low, adjust the pH of the nutrient solution before adding it to the reservoir. Aim for a pH range suitable for your specific plants.
- Flush with pH-Balanced Water: In cases of severe pH imbalances, consider flushing the system with pH-balanced water to reset the growing medium and nutrient solution.
- Check Water Source: Ensure that the water source itself has a consistent pH. If necessary, use pH-balancing additives to bring the water within the desired range.
6.3 Recognizing and Resolving Overwatering or Underwatering:
Proper watering is essential for healthy plant development. Here’s how to recognize and address overwatering or underwatering in your AutoPot system:
- Observation: Monitor the appearance of your plants. Overwatered plants may exhibit yellowing leaves and a lack of vigor, while underwatered plants may have wilting leaves and dry soil.
- Adjust Watering Schedule: If overwatering is suspected, reduce the frequency of watering or adjust the Aqua-Valve to provide less water during each cycle.
- Increase Watering: If plants show signs of underwatering, increase the frequency or duration of watering cycles to ensure they receive an adequate amount of moisture.
- Check Growing Medium: Assess the moisture level in the growing medium regularly. Adjust watering based on the specific needs of the plants and the environmental conditions.
By promptly addressing these common issues through regular monitoring and proactive measures, you can maintain the optimal functionality of your AutoPot system and promote the health and vitality of your cannabis plants throughout their growth cycle.
7. Optimizing Cannabis Growth with AutoPot
To unlock the full potential of your AutoPot system and cultivate premium-quality cannabis, it’s crucial to focus on optimizing key growth factors. This section explores nutrient recommendations, considerations for light and the environment, and training techniques tailored for cannabis grown in an AutoPot system.
7.1 Nutrient Recommendations:
Providing the right nutrients is paramount for robust cannabis growth in an AutoPot system. Follow these guidelines to optimize nutrient levels:
- Balanced Macronutrients: Ensure your nutrient solution contains a balanced mix of macronutrients, including nitrogen (N), phosphorus (P), and potassium (K). Adjust nutrient ratios based on the specific growth stage.
- Micronutrients: Pay attention to micronutrients like iron, zinc, and manganese. Regularly check nutrient solution labels and supplement as needed to address any deficiencies.
| Week | Growth Stage | pH Range | EC (mS/cm) Range | TDS (ppm) Range |
|---|---|---|---|---|
| 1-2 | Seedling | 5.8-6.2 | 0.4-0.8 | 200-400 |
| 3-4 | Early Vegetative | 5.8-6.5 | 0.8-1.2 | 400-800 |
| 5-6 | Mid Vegetative | 5.8-6.5 | 1.2-1.6 | 800-1200 |
| 7-8 | Late Vegetative | 5.8-6.5 | 1.6-2.0 | 1200-1600 |
| 9-10 | Early Flowering | 5.8-6.5 | 1.6-2.0 | 1200-1600 |
| 11-12 | Mid Flowering | 5.8-6.5 | 1.2-1.8 | 800-1400 |
| 13-14 | Late Flowering | 5.8-6.5 | 1.0-1.5 | 500-1000 |
| 15+ | Ripening/Harvest | 5.8-6.5 | 0.6-1.0 | 300-600 |
Remember to use a reliable pH meter, EC meter, or TDS meter to measure these values accurately, and always follow the guidelines provided by your nutrient solution manufacturer.
- pH Monitoring: Continuously monitor and maintain the pH of your nutrient solution within the recommended range for cannabis (typically 5.8 to 6.5). This ensures optimal nutrient availability.
- EC Levels: Measure Electrical Conductivity (EC) levels to gauge the concentration of dissolved salts in the nutrient solution. Adjust nutrient strength based on the growth stage and plant requirements.
- Regular Checks: Conduct regular checks of plant foliage for signs of nutrient deficiencies or excesses. Adjust nutrient levels accordingly to achieve vibrant and healthy growth.
7.2 Light and Environmental Considerations:
Light and environmental conditions significantly impact cannabis growth. Tailor these factors to optimize your AutoPot-grown cannabis:
- Light Spectrum: Choose a suitable light spectrum for each growth stage. Use blue light for vegetative growth and switch to red light during the flowering phase. Consider full-spectrum LED lights for versatility.
- Light Intensity: Adjust light intensity based on the size of your growing space and the needs of your plants. Aim for an optimal balance to prevent light stress or insufficient illumination.
- Temperature and Humidity: Maintain a consistent temperature and humidity range. For most cannabis strains, aim for temperatures between 70-85°F (21-29°C) and humidity levels around 40-60%, adjusting as needed during different growth stages.
- Ventilation: Ensure proper ventilation to prevent heat buildup and maintain a steady supply of fresh air. Good air circulation helps prevent mold and mildew issues.
7.3 Training Techniques for AutoPot Grown Cannabis:
Training your cannabis plants promotes even canopy development, maximizes light exposure, and enhances yields. Here are effective training techniques for AutoPot-grown cannabis:
- LST (Low Stress Training): Gently bend and tie down branches to encourage a more horizontal growth pattern. This technique improves light penetration and promotes the development of multiple colas.
- Topping: Prune the apical bud to encourage the growth of multiple main colas. This enhances overall plant structure and encourages an even canopy.
- Super Cropping: Carefully bend or squeeze stems to create small, controlled injuries. This technique promotes lateral growth, strengthens branches, and increases bud sites.
- Scrog (Screen of Green): Install a screen or netting above the plants to train them to grow horizontally. This method optimizes light distribution and encourages an even canopy.
- Defoliation: Remove selected fan leaves strategically to improve light penetration and airflow. Exercise caution to avoid stress, especially during the flowering stage.
By implementing these optimization strategies tailored to AutoPot systems, you’ll create an environment where your cannabis plants can thrive, resulting in healthy growth, high yields, and premium-quality buds.
8. Final Tips for Successful Cannabis Cultivation with AutoPot
As you embark on your cannabis cultivation journey with the AutoPot system, here are some final tips to ensure a successful and rewarding experience:
- Consistent Monitoring: Regularly observe your plants for any signs of nutrient deficiencies, pests, or stress. Early detection allows for prompt intervention and corrective measures.
- Record-Keeping: Maintain a cultivation journal to log key parameters such as watering schedules, nutrient levels, and any adjustments made. This documentation helps identify patterns and fine-tune your approach over successive grows.
- Strain Compatibility: Understand the specific needs and characteristics of the cannabis strain you are cultivating. Different strains may respond differently to nutrient levels, training techniques, and environmental conditions.
- Quality Water Source: Ensure that your water source is of high quality, free from contaminants that could affect plant health. Consider using filtered or pH-adjusted water to provide an optimal foundation for your nutrient solution.
- Regular Cleaning: Implement a routine cleaning schedule for system components such as tubing, reservoirs, and Aqua-Valves. This helps prevent blockages, maintain optimal water flow, and ensures a hygienic environment for plant growth.
- Adapt to Environmental Changes: Be prepared to adjust your cultivation practices in response to changes in environmental conditions. Temperature, humidity, and light intensity may fluctuate, requiring adaptable strategies for optimal plant health.
- Patience during Transitions: Whether transitioning seedlings, adjusting nutrient levels, or implementing training techniques, exercise patience. Plants may take time to acclimate, and gradual adjustments often yield better results than abrupt changes.
- Community Engagement: Connect with fellow growers and enthusiasts through online forums, social media, or local gardening communities. Sharing experiences, tips, and troubleshooting advice can provide valuable insights for improving your cultivation skills.