Introduction
When it comes to growing cannabis, every grower’s goal is to achieve abundant yields of high-quality buds. One of the most effective ways to accomplish this is through the use of cannabis training techniques. These techniques involve manipulating the growth and structure of the cannabis plant to maximize bud production. In this comprehensive guide, we will explore ten essential cannabis training techniques that every grower should know. By implementing these techniques, you can significantly increase your yields and improve the overall quality of your harvest.
Table of Contents
4. Defoliation (Strategically Removing Leaves)
7. Manifolding (aka Mainlining)
1. Topping
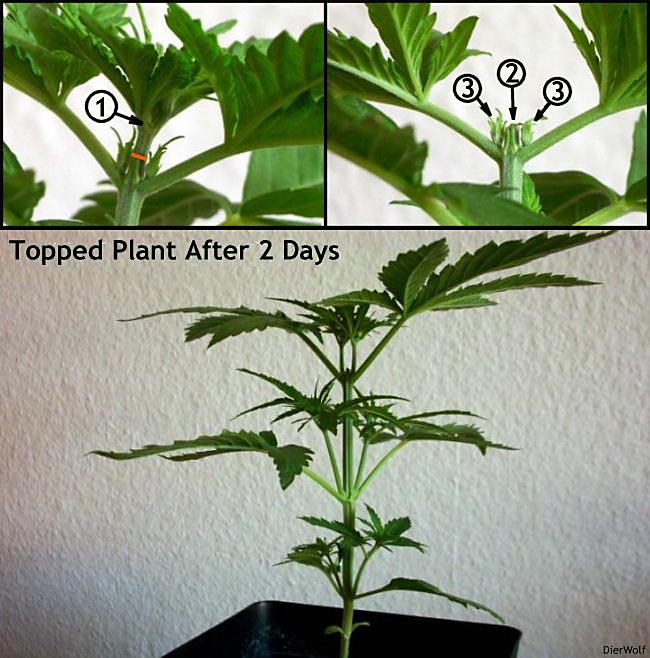
Topping cannabis plants is a well-established technique used by both indoor and outdoor growers. By cutting off the top part of the plant, growers can control its growth and encourage the development of more branches. In this comprehensive guide, we will explore why and when to top cannabis plants, how to perform the technique. So, let’s dive in!
Why Top Cannabis Plants
One of the main reasons growers choose to top their cannabis plants is to manage their height and improve their overall structure. Cannabis plants have a natural tendency to grow tall and thin, mimicking a pine or Christmas tree shape. However, this growth pattern may not be ideal for certain growing environments with limited space or a need for discretion.
By topping the plant, growers can control its height and encourage lateral growth. When the top part of the plant is cut off, two Y-shaped branches will grow in its place. These branches are recognized by the plant as “central” stems, and they will develop into new growth points. Topping does not result in a loss of yield; instead, it promotes the growth of more branches, potentially leading to higher overall yields.
When to Top Cannabis Plants
Timing is crucial when it comes to topping cannabis plants. It is important to wait until the plant has reached a certain stage of growth before performing the technique. Generally, it is recommended to top the plant when it has 5 to 7 leaf nodes and is at least 30 days old. At this stage, the plant is strong enough to handle the stress of topping.
It is essential to ensure that the plant is healthy and in optimal condition before topping. This includes providing adequate nutrition, lighting, and environmental conditions. Topping should not be performed on weak or stressed plants, as it can further compromise their health. By waiting for the right moment, growers can maximize the benefits of topping and minimize any negative effects.
How to Top Cannabis Plants
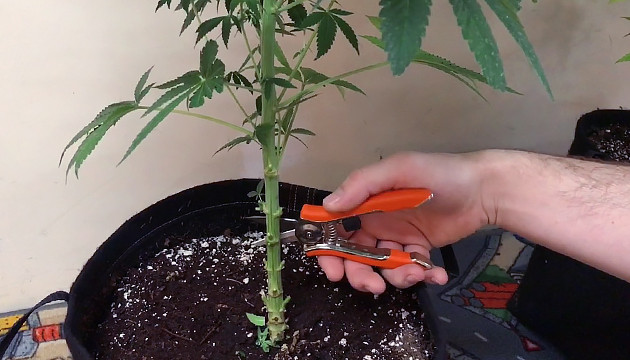
Performing the topping technique requires precision and proper tools. Before starting, gather a pair of sharp pruning scissors and thoroughly clean them to prevent any potential infections. Sterilizing the tools is highly recommended to ensure the health of the plant.
Once your plant is ready for topping, locate the spot where you want to make the cut. It is crucial to cut above the 5th leaf node, ensuring that the plant is sturdy enough to handle the stress. By cutting above this node, the plant will have enough lower branches to grow outwards, promoting a bushier and wider structure.
After making the cut, monitor the plant closely to ensure it is recovering nicely. If performing the technique outdoors, it is advisable to use pruning sealer for cuttings to prevent infections. The exposed cut can make the plant vulnerable to fungi and bacteria, so taking preventive measures is essential for its overall health.
Benefits of Topping Cannabis Plants
Topping cannabis plants offers several benefits for growers. Here are some of the key advantages:
- Controlled height: Topping allows growers to manage the height of their plants, making it suitable for indoor spaces with limited vertical clearance or for discreet outdoor growth.
- Increased yields: By topping the plant and promoting lateral growth, growers can create more colas and potentially increase overall yields.
- Optimal light distribution: Topped plants tend to have a more even distribution of light, ensuring that each cola receives adequate light exposure for optimal bud development.
- Improved plant structure: Topping encourages the development of a bushier and wider plant structure, which can lead to better light penetration and airflow, reducing the risk of pests and diseases.
- Better use of grow space: Topped plants can efficiently utilize the available space, making them ideal for techniques like SCRoG (Screen of Green) or other training methods.
By taking advantage of these benefits, growers can optimize their cannabis cultivation and achieve healthier and more productive plants.
Common Mistakes to Avoid
While topping can be a valuable technique for cannabis growers, there are some common mistakes to avoid to ensure successful results. Here are a few:
- Topping too early: It is essential to wait until the plant has at least 5 to 7 leaf nodes before topping. Topping too early can stress the plant and impede its recovery.
- Not sterilizing tools: Failing to clean and sterilize pruning tools can introduce bacteria and fungi to the plant, leading to potential infections.
- Topping weak or stressed plants: Only top plants that are healthy and in optimal condition. Topping weak or stressed plants can further compromise their health and growth.
- Not providing proper aftercare: Monitor the topped plant closely and ensure it is recovering well. Maintain optimal growing conditions, including nutrition, lighting, and airflow, to support its healing process.
- Topping too aggressively: Avoid excessive pruning or topping multiple times in quick succession. Overdoing it can severely stress the plant and hinder its overall growth and development.
By being mindful of these mistakes and following best practices, growers can optimize their success with topping cannabis plants.
Topping Outdoor vs Indoor Plants
The decision to top cannabis plants can vary depending on whether they are grown indoors or outdoors. Here are some considerations for each scenario:
Topping Outdoor Plants
When growing cannabis plants outdoors, topping can be beneficial for several reasons. By topping the plant, growers can control its height, making it less conspicuous and easier to manage. Topping also promotes lateral growth, which can help outdoor plants utilize available sunlight more efficiently. Additionally, topped outdoor plants tend to have a bushier structure, which can provide better airflow and reduce the risk of mold and mildew.
Topping Indoor Plants
Indoor growers often opt for topping to control the height of their cannabis plants and maximize their use of grow space. Topped plants can be trained using techniques like low-stress training (LST) or SCRoG, allowing growers to create an even canopy and increase light exposure to all colas. Topping also helps indoor plants develop a more desirable bushy structure, ensuring optimal airflow and reducing the risk of pests and diseases.
Overall, topping can be a valuable technique for both outdoor and indoor cannabis cultivation, providing growers with more control over plant height and structure.
Topping Techniques for Different Strains
Different cannabis strains may require specific topping techniques to achieve the desired results. Here are some considerations for topping different types of strains:
- Indica strains: Indica strains tend to have a more compact and bushy growth pattern naturally. Topping these strains can help enhance their lateral growth and promote a more even canopy.
- Sativa strains: Sativa strains are known for their tall and slender growth structure. Topping these strains can help control their height and encourage a bushier structure.
- Hybrid strains: Hybrid strains, which combine indica and sativa genetics, can vary in their growth patterns. Consider the dominant characteristics of the hybrid strain when deciding on the topping technique.
It is important to research the specific strain and its growth characteristics to determine the best approach for topping. Experimentation and observation can also help growers understand how their plants respond to topping and make adjustments accordingly.
Maintaining Health and Recovery After Topping
After topping cannabis plants, it is crucial to provide them with proper care and support for recovery. Here are some tips to ensure the health and well-being of topped plants:
- Optimal nutrition: Provide balanced nutrients suitable for the vegetative stage of growth to support the plant’s recovery and promote healthy new growth.
- Proper lighting: Ensure that the topped plant receives adequate light, adjusting the distance and intensity of the grow lights as needed.
- Airflow and ventilation: Maintain proper airflow and ventilation in the growing environment to prevent the buildup of moisture and reduce the risk of mold or mildew.
- Training and support: Depending on the desired plant structure, consider using techniques like LST or SCRoG to train and support the new growth resulting from topping.
- Monitor and adjust: Regularly monitor the topped plant’s progress and make any necessary adjustments to environmental conditions, watering, and nutrient levels.
By providing the necessary care and attention, growers can help their topped plants recover and continue to thrive throughout their growth cycle.
2. Low Stress Training (LST)
Low Stress Training (LST) is a highly effective plant training technique that can significantly increase cannabis yields. This technique involves gently manipulating the branches of the plant to create a more even canopy, promote the growth of multiple colas, and optimize light penetration. LST is widely used by experienced growers to maximize the potential of their cannabis plants. In this comprehensive guide, we will explore the benefits of LST, the step-by-step process of implementing it, and provide valuable tips and insights for successful implementation.
Benefits of Low Stress Training
Low Stress Training offers numerous benefits for cannabis growers. By implementing LST, you can:
- Increase Yields: LST allows for the creation of multiple main colas, resulting in larger yields without changing your setup.
- Optimize Light Distribution: By bending and training the branches, LST ensures that all parts of the plant receive optimal light exposure, leading to bigger and denser buds.
- Control Plant Height: LST is particularly useful for controlling the height of tall sativa cultivars or when growing in low-ceilinged spaces.
- Improve Bud Quality: With LST, you can achieve more even canopy development, leading to consistent bud quality throughout the plant.
- Maximize Space and Airflow: By spreading out the branches, LST increases airflow within the canopy, reducing the risk of mold and maximizing the utilization of indoor garden space.
How Does Low Stress Training Work?
Low Stress Training involves bending and manipulating the branches of the cannabis plant to create a more desirable shape and structure. By gently training the branches, you can prevent the dominance of a single main cola and encourage the growth of multiple colas. This technique works by breaking apical dominance, allowing the lateral branches to receive more nutrients and light, resulting in increased bud development.
To implement LST effectively, it is essential to start early in the vegetative stage when the branches are still soft and pliable. As the plant grows, routine maintenance is required to tie down the vertical branches and maintain an even canopy. LST can be used in conjunction with other plant training techniques like SCROG (Screen of Green) to further optimize yield potential.
Step-by-Step Guide: How to Implement Low Stress Training
Implementing Low Stress Training requires careful planning and execution. Follow these steps to successfully train your cannabis plants:
Step 1: Assess the Plant
Before starting LST, assess the structure of your cannabis plant. Identify the main stem and the lateral branches that you want to train. Make sure the plant has developed a strong root system and has at least five nodes before beginning the training process.
Step 2: Gather the Necessary Materials
To perform LST, you will need a few materials:
- Soft ties or plant training clips: These will be used to secure the branches in their desired positions.
- Anchor points: Identify suitable anchor points, such as the sides of the pots or use binder clips attached to the lip of the containers.
Step 3: Bend the Branches
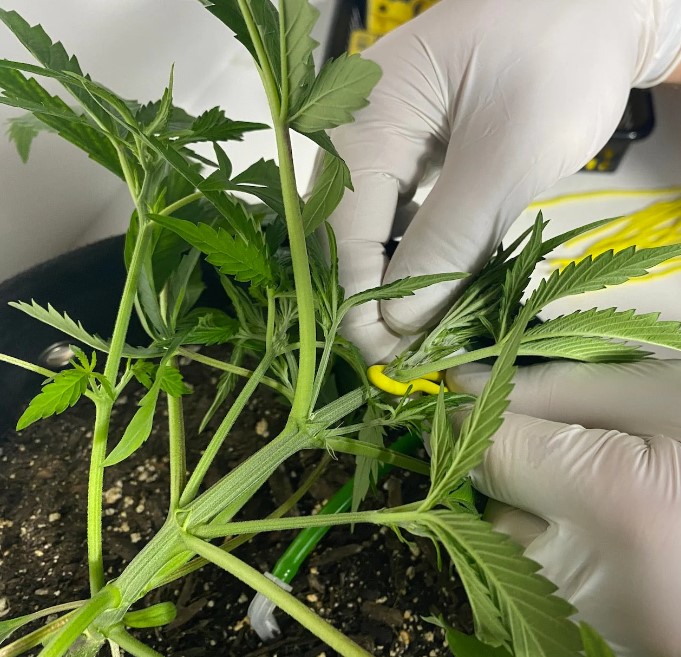
Begin by gently bending the tallest vertical tip down to the desired height. Hold the stem a few centimeters from where it connects to the main stem to avoid putting excessive pressure on the joint. Gradually bend the branch lower each day until it reaches the desired position. For stubborn branches, you can pinch and rub the stem together to soften the cell walls, making it easier to bend.
Step 4: Secure the Branches
Once the branches are bent to the desired positions, use soft ties or plant training clips to secure them in place. Attach one end of the tie to the branch and the other end to the anchor point. Ensure that the ties are not too tight to allow for growth and prevent damage to the branches.
Step 5: Maintain and Adjust
Regularly check the plant and make adjustments as needed. As the branches continue to grow, tie down the vertical ends to maintain an even canopy. Be mindful of the growth patterns and adjust the training accordingly to ensure optimal light exposure and airflow.
Step 6: Transition to Flowering Stage
As the flowering stage approaches, consider installing a SCROG net if you haven’t already. Gently guide the branches through the net to increase the horizontal footprint and create an even canopy. Continue routine maintenance and adjustments throughout the flowering stage to ensure optimal bud development.
Tips for Successful Low Stress Training
To maximize the benefits of Low Stress Training, consider the following tips:
- Start Early: Begin LST in the early vegetative stage when the branches are still flexible and easy to manipulate.
- Be Gentle: Avoid applying excessive force when bending the branches to prevent breakage or damage to the plant.
- Regular Maintenance: Continuously monitor the plant’s growth and make adjustments as needed to maintain an even canopy.
- Use Suitable Materials: Choose soft ties or plant training clips with protective coatings to avoid damaging the branches.
- Optimize Light Distribution: Position your grow lights to ensure optimal light penetration to all parts of the plant, promoting even bud development.
- Provide Adequate Support: Use anchor points or SCROG nets to provide support for the trained branches and prevent them from sagging or breaking.
- Monitor Airflow and Humidity: Regularly check the airflow within the canopy and monitor humidity levels to prevent the development of mold or mildew.
Conclusion
Low Stress Training is a highly effective plant training technique that can significantly increase cannabis yields. By gently manipulating the branches and creating an even canopy, growers can optimize light distribution, control plant height, and improve bud quality. Through careful planning and execution, Low Stress Training can be successfully implemented, resulting in larger and denser buds. Incorporate this technique into your cannabis cultivation practices to maximize your harvest and achieve optimal results. Happy growing!
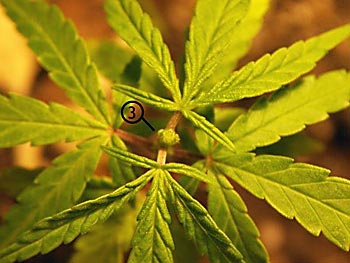
3. Supercropping

Why Supercrop Cannabis?
Supercropping is a high-stress training technique that involves gently squeezing and bending the branches of cannabis plants. This process damages the inner fibers of the stem while leaving the outer lining intact. While it may seem counterintuitive, this stress actually benefits the plants by stimulating their defense mechanisms and triggering increased nutrient uptake and growth.
By supercropping, you can manipulate the growth pattern of your plants. After the branches are cropped, they become weak and flimsy, allowing you to tie them down and train them to grow in a specific direction. As the plants recover, they develop thick knots at the crop points, providing additional support for the weight of the buds during flowering.
When to Supercrop
It is recommended to supercrop your cannabis plants during the late vegetative stage, ideally about 3-7 days before transitioning them into the flowering stage. This timing allows the plants to recover from the stress of cropping before they shift their focus towards bud development. It is important to note that supercropping should only be performed on healthy plants, free from pest infestations or nutrient deficiencies.
For experienced growers, supercropping can also be done within the first two weeks of flowering. This period, known as the “stretching” phase, is characterized by rapid growth and can benefit from the structural support provided by supercropping. As you become more familiar with this technique, you can experiment with different timings during the plant’s life cycle to achieve specific goals.
What You Need to Supercrop
To perform supercropping, you will need a few simple tools:
- Your fingers: These will be used to gently squeeze and bend the branches.
- String or zip ties: These will be used to tie down the supercropped branches and hold them in place.
- Garden stakes or dowels: These can provide additional support for the branches if needed.
- Duct tape: This can be used to repair any broken branches and provide temporary support.
Patience is also crucial when supercropping cannabis plants. Take your time, be gentle, and observe how the plants respond to the technique.
How to Supercrop Your Cannabis Plants
Supercropping may seem intimidating at first, but with the right knowledge and technique, it can be easily mastered. Here is a step-by-step guide on how to supercrop your cannabis plants:
- Identify the branches to crop: Choose mature branches that are taller than the others and in need of height control or better light distribution.
- Prepare the branches: Gently squeeze the branch between your thumb and fingers, applying enough pressure to weaken the inner fibers without damaging the outer layer. You can roll the branch between your fingers to make it more pliable.
- Bend the branches: Bend the branch in the desired direction, taking care not to break it. The branch should be bent at approximately a 90-degree angle.
- Tie down the branches: Use string or zip ties to secure the supercropped branches in their new positions. This will help them recover and maintain the desired shape. Be careful not to tie them too tightly, as this can restrict growth.
- Monitor and adjust: Check on the supercropped branches regularly and make any necessary adjustments. As the plants recover, they may try to revert to their original vertical position, so it’s important to keep them in place until they strengthen.
The Benefits of Supercropping
Supercropping offers several benefits for cannabis growers. Here are some of the main advantages:
- Increased yields: Supercropping allows for better light penetration and more even distribution among the buds. This results in increased bud development and higher yields.
- Controlled plant height: By bending and training the branches, you can control the overall height of your plants. This is especially useful for indoor growers who want to optimize their grow space and keep the plants at a manageable height.
- Enhanced resin production: The stress caused by supercropping can stimulate the production of trichomes, which are responsible for resin production. This can lead to higher potency and better-quality buds.
- Improved structural support: The knots that form at the crop points provide additional support for the weight of the buds during flowering. This helps prevent branches from breaking and ensures a healthy, robust plant structure.
Supercropping in Combination with Other Techniques
While supercropping can be effective on its own, combining it with other training techniques can further enhance its benefits. Here are two popular methods to consider:
- Low-Stress Training (LST): LST involves bending and tying down the branches to create a more horizontal canopy. By combining LST with supercropping, you can achieve even better light distribution and bud development.
- Screen of Green (SCROG): SCROG involves placing a screen or net over the plants and weaving the branches through it. This technique, when combined with supercropping, can create an even canopy and maximize bud sites.
Experimenting with different combinations of training techniques can help you find the best approach for your specific growing environment and goals.
Common Concerns and Troubleshooting
While supercropping is generally a safe and effective technique, there are some common concerns and potential issues to be aware of. Here are a few troubleshooting tips:
- Broken branches: If a branch breaks during the supercropping process, you can use duct tape to bind the split and provide support. The plant will heal and form a knuckle at the site of the break.
- Recovery time: After supercropping, plants may need some time to recover and adjust to their new shape. Be patient and monitor their progress, making any necessary adjustments to ensure proper healing and growth.
- Overcropping: It’s important not to supercrop too many branches at once, as this can overwhelm the plants and hinder their ability to recover. Start with a few branches and gradually increase the number as you gain experience.
- Timing: Super cropping should be done during the appropriate stage of growth, as mentioned earlier. Performing it too early or too late can result in suboptimal results or additional stress on the plant.
Supercropping Outdoors
Supercropping is not limited to indoor growing. Outdoor growers can also benefit from this technique, especially when it comes to controlling plant height and visibility. By supercropping the main stem and tying it down, you can reduce the overall height of your plants and make them less conspicuous.
Outdoor supercropping can be particularly useful if you have height restrictions or privacy concerns. However, keep in mind that outdoor plants may require additional support, such as stakes or trellises, to withstand environmental factors like wind and rain.
Supercropping Autoflowers
Contrary to popular belief, autoflowering cannabis plants can also be supercropped. However, it is essential to exercise caution and be mindful of the plant’s growth cycle. Autoflowers have a limited vegetative stage, and any stress applied during this period can impact their overall growth and yield.
If you choose to supercrop autoflowers, it’s best to do so during the early vegetative stage or when the main central bloom is growing significantly faster than the rest. This can help create a more balanced canopy and maximize light utilization. Remember to be gentle and monitor the plants closely to ensure they recover without adverse effects.
4. Defoliation (Strategically Removing Leaves)
What is Defoliation?
Defoliation is the process of selectively removing leaves from cannabis plants. By removing excess foliage, growers aim to improve light penetration to lower nodes and enhance airflow around the plant. In nature, cannabis plants use their leaves to store nutrients for stressful times. However, when grown indoors, this excess foliage becomes unnecessary and can impede the development of big yields. Defoliation helps plants make better use of their limited light source and reduces the risk of temperature and humidity issues, as well as pests and mold.
It’s important to note that defoliation is different from lollipopping, which involves removing foliage and branches from the bottom part of the plant, leaving only the top branches. Defoliation, on the other hand, strategically removes leaves from different areas of the plant without necessarily removing bud sites or branches.
The Benefits of Defoliation
Defoliation offers several benefits that can help maximize cannabis yields. Here are some key advantages:
Increased Energy Utilization
Cannabis plants have a finite amount of energy to fuel growth. By removing foliage that won’t support the development of buds, growers allow plants to concentrate their energy on the most productive parts. This helps plants make better use of their limited resources and ultimately leads to bigger and higher quality yields.
Improved Airflow
Excess foliage can restrict airflow around cannabis plants, creating a favorable environment for pests and mold. Defoliation opens up space between branches, allowing air to circulate more freely. This improved airflow reduces the risk of pest infestations and mold growth, leading to healthier plants and better overall yield.
Enhanced Light Penetration
When cannabis plants grow thick foliage, lower nodes are often overshadowed, limiting their access to light. By removing excess leaves, growers can ensure that light reaches all parts of the plant, including lower nodes. This promotes more even growth and allows for better bud development throughout the entire plant.
Reduced Environmental Stress
Indoor growing provides a controlled environment with stable temperature and humidity levels. In such an environment, cannabis plants don’t need as much foliage for protection against external stressors like droughts or nutrient shortages. By removing excess leaves, growers can reduce the risk of environmental stress and create a more optimal growing environment.
Choosing the Right Plants for Defoliation
Not all cannabis plants are suitable for defoliation. It’s essential to choose plants that are healthy and robust. Here are some factors to consider when selecting plants for defoliation:
Overall Health
Only defoliate plants that are 100% healthy. Look for plants with strong, upright stems, green leaves, fast growth, and a well-draining, fast-drying medium. Avoid defoliating plants that show signs of nutrient deficiencies, over or under-watering, nutrient or light burn, wind damage, or pest infestations.
Indoor vs. Outdoor
Defoliation is primarily recommended for indoor plants. Outdoor plants face more consistent environmental stressors and can benefit from the natural light penetration even with thicker foliage. Additionally, outdoor plants have a larger space to spread out, making defoliation less necessary.
How to Defoliate Cannabis Plants
Defoliation should be done strategically and with caution to avoid damaging the plants. Here is a step-by-step guide to defoliating cannabis plants:
Vegetative Phase
- Start by removing large fan leaves that overshadow lower nodes and impede light penetration.
- Remove any leaves growing towards the inside of the plant, as they also block light from reaching bud sites.
- Eliminate any old or yellowing foliage that is no longer contributing to the plant’s overall health.
- For beginners, it’s recommended to defoliate only the bottom half of the plant. Be cautious and avoid removing vital leaves.
- More experienced growers can defoliate up to 20-25% of the plant’s foliage, focusing on the bottom to middle sections. Be mindful not to remove leaves necessary for bud development.
Flowering Phase
- Roughly three weeks into the flowering phase, conduct a light defoliation similar to the vegetative phase.
- Pay extra attention not to disturb young buds when removing leaves.
- After defoliation, resume regular feeding and watering schedules, allowing the plants to develop their flowers.
Knowing What Foliage to Remove
Defoliation is an art that requires experience and knowledge of the specific plant’s needs. When in doubt, it’s better to err on the side of caution and remove only foliage that clearly obstructs bud production. Focus on large fan leaves and interior foliage that covers bud sites.
Quick Tips for Optimal Defoliation
- Grow low, flat, and wide to maximize yield indoors.
- Begin removing foliage from the bottom of the plant, gradually working upward.
- Take it slow and avoid removing too much foliage at once. Beginners should aim to remove no more than 10-15% of total foliage at a time.
- Use sharp scissors for precise cuts and ensure they are clean to minimize the risk of disease and infection.
- Different strains can handle different levels of defoliation. Bushy indicas tend to tolerate defoliation well, while sativas naturally have fewer leaves and may not handle as much removal.
Defoliation vs. Pruning: Understanding the Differences
It’s important to differentiate between defoliation and pruning, as these techniques serve different purposes in cannabis cultivation.
Defoliation
- Involves selectively removing leaves to enhance light penetration and airflow.
- Does not necessarily involve removing branches or bud sites.
- Aims to reduce excess foliage and optimize energy utilization.
Pruning
- Involves removing entire branches and nodes in addition to leaves.
- Helps the plant focus energy on specific nodes with the best light exposure.
- Results in bigger, denser, and more potent flowers.
While both techniques can be used together to optimize yield, it’s crucial to understand their distinct objectives and execute them accordingly.
5. Lollipopping
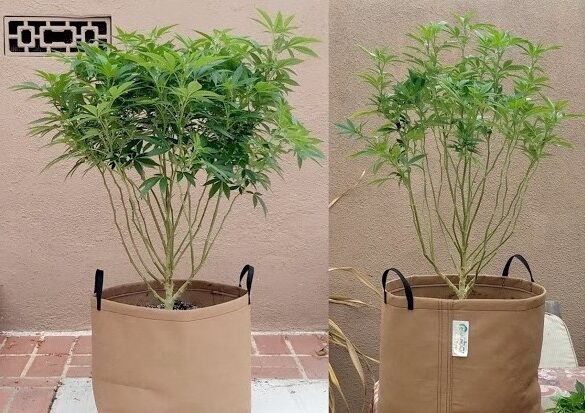
Lollipopping is a technique that focuses on removing the lower branches and leaves of the cannabis plant. The goal is to create a “lollipop” shape, with all the foliage concentrated at the top of the plant, resembling a lollipop stick. By removing the lower branches that receive little light and produce small buds, you can redirect the plant’s energy towards the topmost buds. This technique helps improve airflow and light penetration, resulting in larger and denser buds.
The Benefits of Lollipopping
Cannabis plants have a limited amount of energy, and as a grower, it’s important to help them direct that energy to the areas producing the best possible buds. Lollipopping is a technique that does just that. By removing the lower branches and foliage, lollipopping allows for better light penetration and airflow to the topmost bud sites. This shift in energy allocation results in bigger, denser buds with maximum potency and flavor.
How to Lollipop Your Cannabis Plants
Lollipopping is a simple technique that can be performed just before your plants enter the flowering stage. Here’s a step-by-step guide on how to lollipop your cannabis plants:
- Gather the Right Tools: Start with sharp, clean shears or trimming scissors. You’ll also need a plan and a clear vision of which branches to remove.
- Remove Obvious Foliage: Begin by removing the lower branches near the bottom of the plant that won’t receive enough light to develop fully.
- Prune Unproductive Branches: Follow Kyle Kushman’s pruning advice and remove any branches that don’t break at least 50% of the height of the plant. These lower branches will get shaded out during the flowering stage and won’t develop properly.
- Remove Interior Foliage: Remove branches growing in the middle of the plant, specifically those underneath the canopy. These branches not only receive less light but also cover up potential bud sites.
- Lollipop Each Branch: Start lollipopping each individual branch by removing all growth leading up to the topmost nodes. Some growers recommend leaving no more than three nodes from the tip of each branch, but this may vary depending on the strain and plant size.
- Allow for Recovery: Give your plants 2-3 days to recover before flipping your lights. Avoid over-pruning, as this can stunt their growth.
Lollipopping vs. Defoliation — Understanding the Differences
It’s important to differentiate between lollipopping and defoliation, as these techniques serve different purposes. While lollipopping focuses on removing lower branches and foliage to direct energy to the topmost bud sites, defoliation aims to improve light exposure and airflow for all parts of the plant. Lollipopped plants will have bare stems towards the bottom, resembling lollipop sticks, while defoliated plants will have fewer leaves overall.
Additional Information:
- Lollipopping should be done just before the flowering stage begins for the best results.
- It is important to monitor the recovery of your plants after lollipopping and adjust watering and nutrient levels accordingly.
- Lollipopping can be performed on both indoor and outdoor cannabis plants.
- Always use clean and sharp tools when pruning to minimize the risk of introducing pests or diseases to your plants.
- Regular maintenance and observation of your plants are crucial to ensure they are responding well to the lollipopping technique.
6. Sea of Green (SoG)
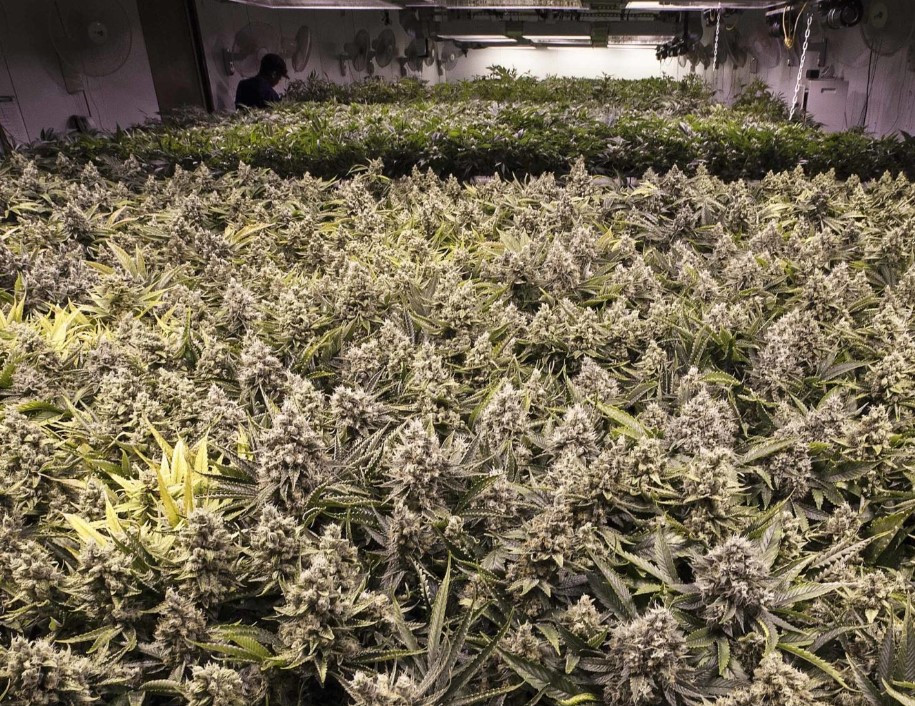
When it comes to maximizing yield in a limited grow space, the Sea of Green (SoG) method is a popular technique among growers. By growing many small plants in a compact area, rather than focusing on a few larger plants, the SoG method creates a dense canopy of buds, resulting in higher yields. In this article, we will explore the advantages and disadvantages of the SoG method, as well as provide a step-by-step guide on how to implement it successfully.
What is the Sea of Green Method?
The Sea of Green method involves growing numerous small plants in a confined space, rather than allowing them to grow larger. By doing so, the plants are forced into flowering earlier, which trains them to utilize their canopy more efficiently. The close proximity of the plants promotes vertical growth, creating a dense sea of buds.
The key principle behind the SoG method is to focus on developing one main, heavy bloom per plant, rather than multiple side blooms. This allows the plants to begin flowering at a smaller size and achieve a greater yield in a shorter harvest time.
How to Practice the Sea of Green Method
1. Germination and Strain Selection
To begin, you will need to germinate seeds or obtain cuttings to create clones. While seeds can be used, clones are often preferred for their faster flowering time and uniformity. Choose Indica strains, as they tend to have shorter and bushier growth patterns, making them ideal for the SoG method.
2. Pot Size and Plant Density
To control the size of the plants, use smaller pots of around 4-6 liters. This prevents the plants from growing too tall and encourages them to focus their resources on the main bloom. The pots should be placed close together, with typically 1-2 plants per square foot. However, be cautious not to overcrowd the plants, as they may compete for light and become stressed.
3. Lighting and Canopy Management
Proper lighting is crucial for the success of the SoG method. Choose a light with evenly distributed diodes to ensure all plants receive equal amounts of light.
As the plants grow, ensure they are at an even height and trim any branches that are not part of the main canopy. This helps concentrate the plants’ energy on the main cola and prevents wasted growth.
4. Vegetative and Flowering Stages
During the vegetative stage, provide the plants with 18 hours of light and 6 hours of complete darkness. The vegetative cycle will be shorter than usual, typically lasting 4-6 weeks until the plants reach a height of 10-12 inches. Some growers even switch to the flowering stage after just 2-3 weeks when the plants are around 6 inches tall.
Once the plants enter the flowering stage, switch to a light regimen of 12 hours of light and 12 hours of darkness. This encourages the plants to widen their canopy and focus their energy on the main cola.
5. Harvesting
The time spent in the flowering stage will vary depending on the specific strain you are growing. To determine if the plants are ready for harvest, examine the trichomes on the buds. If they are white and cloudy, it is a good indication that the plants are mature. While the plants grown using the SoG method may be smaller in size, the overall yield per square foot is typically larger compared to traditional growing methods.
Advantages of the Sea of Green Method
The Sea of Green method offers several advantages for growers:
- Maximizing Yield in Limited Spaces: The SoG method allows growers to achieve high yields in small grow spaces. By utilizing the vertical growth of numerous small plants, the canopy is densely packed with buds, resulting in a greater overall yield.
- Shorter Grow Cycles: The expedited growing process of the SoG method means more frequent and heavier harvests. This is especially beneficial for commercial or large-scale growers who require a continuous supply of harvests.
- Efficient Use of Space and Light: The compactness of the plants in the SoG method ensures efficient use of both space and light. With proper canopy management, all plants receive equal amounts of light, resulting in uniform growth and development.
- Future Clones from Trimmings: As you trim branches underneath the main canopy, you can propagate these trimmings and use them for clones in future grows. This allows for cost-effective and sustainable cultivation.
Disadvantages of the Sea of Green Method
While the Sea of Green method offers numerous advantages, there are a few disadvantages to consider:
- Need for Sufficient Plant Quantity: The SoG method requires a sufficient number of plants to create a dense canopy. This can be a challenge for growers in regions where cultivation is limited by law, as they may be restricted in the number of plants they can grow.
- Smaller Plant Size: Due to the compact nature of the SoG method, the individual plants tend to be smaller in size compared to traditional growing methods. However, the overall yield per square foot is still higher due to the increased number of plants.
- Limited Strain Selection: Not all strains are suitable for the SoG method. Strains with a quick vegetative cycle are preferred, which limits the variety of strains that can be grown simultaneously. The canopy needs to be even, so it is important to choose strains with similar growth patterns.
- Maintenance Challenges: With a higher number of plants in a confined space, there is increased maintenance required. Accessing plants in the center of the canopy can be difficult without a proper system in place. Additionally, any pest or disease issues may spread more quickly in the condensed area.
7. Manifolding (aka MainLining)
In your journey as a cannabis grower, you may have come across the term “mainlining” but wondered what it actually means and how it can benefit your plants. Mainlining refers to a training technique that encourages the development of several large, uniform colas instead of just one central cola. By creating a manifold, a Y-shaped structure in the stem, nutrients and resources are redirected to multiple branches, resulting in improved yields and more evenly distributed bud growth.
What is Manifolding/Main-lining?
Mainlining is a hybrid technique that combines various training methods such as low-stress training (LST), topping, and the screen of green (ScroG) technique. It involves splitting the cannabis stem and creating a central hub, known as the manifold, from which multiple branches emerge. This process diverts nutrients and resources to these branches, resulting in the formation of several large colas instead of a single dominant one.
The mainlining technique is relatively simple to implement and requires minimal additional effort once the manifold is created. By following the right steps and timing the training correctly, you can optimize your cannabis plants’ growth and maximize their yield potential.
Benefits of Mainlining Cannabis
The primary advantage of mainlining cannabis is the potential increase in yields. By training the plants to develop several large colas, you can significantly enhance the overall bud production. Here are some additional benefits of mainlining:
- Increased canopy size: Mainlining allows for the development of a larger canopy, maximizing the use of light and increasing overall bud production.
- Easy to implement: With proper guidance and understanding of the technique, mainlining can be easily executed by both beginner and experienced growers.
- Greater control over stretching: By manipulating the plant’s growth pattern, mainlining helps control the stretching phase during the flowering stage, resulting in more uniform and manageable plants.
- Suitable for limited spaces: Mainlining is particularly useful for growers with limited space, as it allows for the cultivation of multiple plants even in a small area.
- One-time training: Mainlining is typically performed during the early stages of cannabis growth and only needs to be done once or twice before the benefits become evident. Once the manifold is created, subsequent growth can be managed through regular pruning and maintenance.
Getting Started with Mainlining
Before diving into the mainlining process, it’s important to gather the necessary equipment and prepare your plants for training.
Equipment Needed
To successfully mainline your cannabis plants, you will need the following equipment:
- Pruning shears: High-quality pruning shears will be essential for trimming and shaping your plants.
- Plant/cable ties: These ties will be used to secure and train the branches in the desired positions.
- Optional: LST plant training clips: These clips can help support the branches during the training process.
Preparing Your Plants
Before starting the mainlining process, ensure that your plants are healthy and robust. It’s crucial to avoid any unnecessary stress on the plants during this training technique.
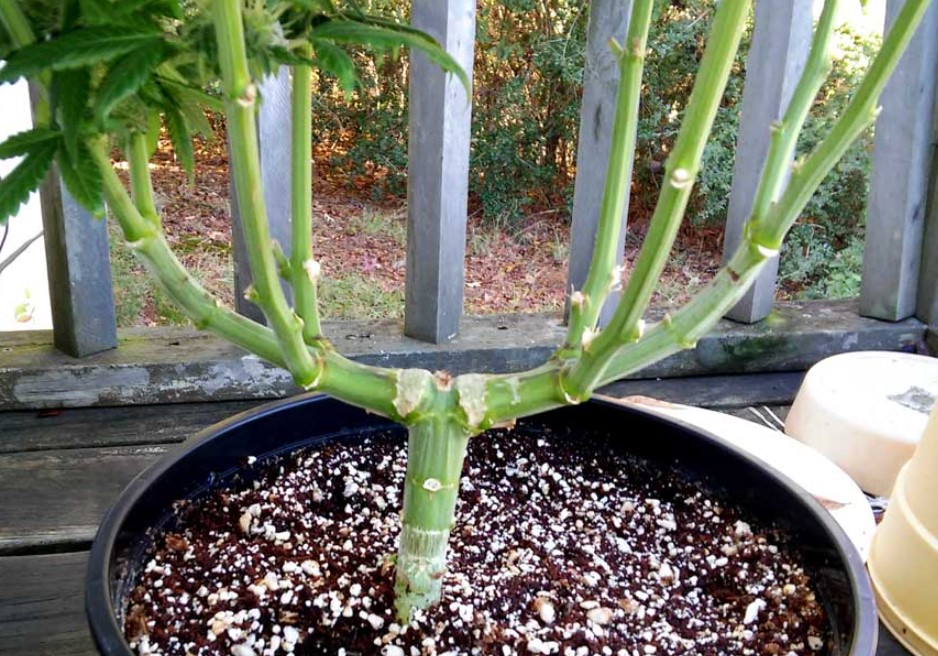
Creating the Manifold
The manifold is the central structure of the mainlining technique. Here’s how to create a manifold:
- Wait until your seedlings have developed between 5 and 8 nodes. It’s important not to top the seedlings too early to allow for proper recovery.
- Cut the entire plant down to the 3rd node, which is the third pair of leaves from the base.
- Remove all additional growth and vegetation below the 3rd node, leaving a central stem with two large fan leaves branching from the top, creating a Y-shaped structure.
- Gently tie down the two main shoots, training them horizontally parallel to the ground. Use plant ties or cable ties to secure the branches, ensuring they remain in the desired position.

Tying Down the Branches
After creating the manifold, it’s crucial to tie down the branches to maintain the desired shape and encourage uniform growth. Regularly check and adjust the ties to ensure both central branches remain tied down and the base of the newly created shoots parallel to the ground. This will help achieve symmetrical growth and maximize the number of colas.
Mainlining Techniques
Timing and proper execution are key when mainlining cannabis plants. Here’s a breakdown of the mainlining process from the early stages to flowering:
Timing and Frequency
Mainlining is typically performed during the early vegetative stage when the plants have developed a few nodes. It’s important to wait until each branch of the manifold has grown four new pairs of leaves before topping them down to the 3rd node. This process can be repeated as new growth emerges, allowing for the development of multiple colas.
Managing Growth During Vegetation
During the vegetative stage, it’s crucial to monitor the growth and adjust the ties as needed to maintain the desired shape and symmetry. Regularly inspect the plants, ensuring that the newer stems are growing to the same height and adjusting the ties accordingly. Provide the plants with proper nutrients, water, and light to support healthy growth.
Transitioning to Flowering
Once you’re satisfied with the height and overall growth of the mainlined plants, you can induce flowering by changing the light schedule to 12 hours of light and 12 hours of darkness. During the flowering stage, continue to prune and manage the plants as needed, ensuring proper airflow and light penetration to all colas.
Tips and Tricks for Successful Mainlining
To achieve the best results with mainlining, consider the following tips and tricks:
Pruning Fan Leaves
Trimming excess fan leaves right before flowering or within the first two weeks of the flowering phase can help maximize light penetration and airflow to each of the newly created colas.
Maintaining Symmetry
Regularly check the plants twice a week to maintain symmetry and adjust the ties accordingly. This will help ensure that the newer stems grow to the same height, resulting in a more uniform canopy.
Choosing the Right Strains
Mainlining is more effective on medium or tall-sized cannabis strains. Dwarf varieties may not show significant benefits from this technique, so choose strains that are genetically predisposed to respond well to training methods.
Hydroponic Considerations
Mainlining can also be implemented in hydroponic setups. However, extra care should be taken when tying down the branches to prevent damage to the plant, as it won’t be anchored directly in soil.
Mainlining vs. Other Training Techniques
While mainlining is an effective training technique on its own, it’s important to understand how it compares to other popular training methods such as super cropping and low-stress training (LST).
Super Cropping
Super cropping involves bending and manipulating the branches to create new growth sites. While it can be effective in shaping the plant and increasing yields, it requires more labor-intensive techniques compared to mainlining.
Low-Stress Training (LST)
LST involves bending and tying down the branches to create a more even canopy and maximize light exposure. Mainlining already incorporates the principles of LST, making it an all-in-one technique that combines various training methods.
Is Mainlining Right for You?
Mainlining is a versatile training technique that can benefit both beginner and experienced growers. However, it may not be suitable for every situation. Autoflowering cannabis strains, for example, grow at a faster pace and may not respond well to the stress caused by topping. Additionally, mainlining is more effective on medium or tall-sized strains, as dwarf varieties may not show significant benefits.
Consider your specific growing conditions, strain selection, and personal preferences before deciding if mainlining is the right technique for you.
8. Screen of Green (ScrOG)

The SCROG (Screen of Green) method is a game-changer for cannabis growers looking to take their skills to the next level. This technique, which involves utilizing a trellis net or SCROG screen to manage the canopy, offers numerous benefits such as increased yields, top-notch buds, and optimal use of growing space. In this comprehensive guide, we will delve deep into the secrets and perks of the SCROG method, equipping you with the knowledge and techniques to supercharge your cannabis harvest.
What is the SCROG Method
The SCROG method, which stands for “Screen Of Green,” gained immense popularity among large cannabis growers in Northern California and Oregon. This training technique involves using a trellis net or SCROG screen to manage the canopy by bending and weaving branches outward through the net. By utilizing this method, growers can achieve enhanced light exposure, increased yields, improved aeration, and optimal results in limited growing areas.
Why You Should Use the SCROG Method When Growing Cannabis
Implementing the SCROG technique offers a multitude of advantages that can significantly enhance your cultivation experience. Let’s explore some of these benefits:
Enhanced Light Exposure
Unlike untrained cannabis plants that typically have a single dominant cola, a SCROG canopy ensures that every flower receives even and direct light. By hanging the lighting rig directly above each bud site, you can maximize their photosynthetic potential, resulting in larger bud size and increased resin production.
Increased Yield
The meticulous training and arrangement of buds in a SCROG setup allow each bud site to thrive under ideal lighting conditions. This ample light distribution significantly boosts the amount of weed your plants can yield. Additionally, the technique transforms the main stem and central cola into a great number of tops or colas, resulting in increased yield potential.
Improved Aeration
The SCROG method promotes airflow surrounding the canopy, which is crucial for maintaining a disease-resistant growing environment. Growers can further enhance air circulation by incorporating a fan, ensuring optimal results.
Benefiting Micro-Growers
The SCROG technique is particularly appealing to home-growers with limited growing areas. By utilizing this method, a single SCROGGED plant can produce more significant results than several smaller, untrained plants. This allows micro-growers to maximize their output and achieve impressive yields.
When and How to Start Your Initial SCROGGING
To effectively implement the SCROG method, it is best to start once the plant has been topped or FIMed and has multiple side branches. These training methods work great together, and the earlier you can start training and SCROGGING your plant, the better. While the SCROG method may lead to increased length of vegetative growth, the potential increase in yield alone is worth the wait.
Here are some tips for using this technique effectively:
- Be gentle when weaving the branches through the net to avoid damaging the plant.
- Keep the branches going in the same direction they have naturally grown. Avoid forcing branches in certain directions or creating hard angles.
- Each section or square of the net should have one branch in it. Avoid having multiple branches growing in one square to create a bushier and more lateral growth structure.
- After the initial SCROG, water the plant and provide it with low-intensity light to help it recover from any stress.
How to SCROG in the Flowering Stage
Once the cannabis plant has reached the desired structure, it is ready to enter the flowering stage. It is crucial to remove any lower or weak growth from the lower section of the plant through a process called lollipopping. This ensures that the canopy is not overcrowded and maximizes the yield potential.
During the first few weeks of the flowering stage, the plant will stretch dramatically. It is important to be proactive with the SCROG training during this period, keeping the branches tucked under the screen or trellis and held down. By planning ahead and arranging the branches accordingly, you can ensure that the branches grow outward instead of upward.
At a certain point in the flowering stage, you will need to let the plant grow vertically and reach for the light. This allows the tops to maximize the available light. Additionally, you may find it useful to add an additional trellis or support to hold up the large buds.
9. FIMming
In the world of cannabis cultivation, there are various techniques and methods that growers employ to optimize their harvests. One such technique that has gained popularity among experienced growers is “fimming.” Fimming, which stands for “F#ck, I Missed,” is a method similar to topping but with a unique twist. By strategically cutting specific parts of the plant, growers can stimulate bushier growth and increase overall yields. In this comprehensive guide, we will explore the ins and outs of fimming cannabis, including how it works, its benefits, and how to successfully implement it in your own grow. So let’s dive in and discover the secrets of fimming!
What is Fimming?
Fimming is a cannabis cultivation technique that involves strategically cutting the top growth tip of a plant. The term “fimming” is derived from the phrase “F#ck, I Missed,” which humorously reflects the initial accidental nature of the technique. When done correctly, fimming encourages the plant to grow multiple lateral branches, resulting in a bushier structure.
How Does Fimming Work?
Fimming works by redirecting the plant’s growth hormones, known as auxins, to the lower parts of the plant. Auxins are responsible for promoting upward growth, and by removing the top growth tip, growers can distribute these hormones to other parts of the plant, stimulating lateral branch development. Unlike topping, which typically results in two new growth tips, fimming can produce up to four new branches. This bushier growth pattern allows for increased bud sites and, ultimately, higher yields.
Benefits of Fimming
Fimming offers several benefits for cannabis growers, including:
a. Increased Yield Potential
By encouraging lateral branch development, fimming creates more bud sites, leading to increased overall yield potential. The additional branches provide more space for flowers to develop, resulting in a denser canopy and a higher number of harvestable buds.
b. Bushier Growth Structure
Fimming promotes a bushier growth structure, which has its advantages. A dense canopy helps maximize light penetration and distribution, ensuring that each bud receives sufficient light for optimal growth. Additionally, a compact plant structure is easier to manage and maintain, particularly in indoor growing environments.
c. Enhanced Air Circulation
The increased branching resulting from fimming allows for better air circulation within the canopy. Proper air movement helps prevent the development of mold, mildew, and other fungal diseases, ensuring a healthier plant overall.
d. Improved Light Distribution
With more lateral branches, light can penetrate deeper into the plant, reaching lower bud sites that would otherwise be shaded. This even distribution of light promotes more uniform growth and can result in higher-quality buds throughout the entire plant.
e. Reduced Plant Height
For growers working with limited vertical space, fimming can help control the height of cannabis plants. By promoting lateral growth and discouraging excessive vertical growth, fimming allows for a more manageable plant size, making it easier to fit within indoor grow spaces or discreet outdoor gardens.
When to FIM Your Cannabis Plants
Timing is crucial when it comes to fimming cannabis plants. Fimming is typically performed during the vegetative stage of growth, after the plant has developed a few nodes with branches and leaves. At this stage, the plant is actively growing and can recover more effectively from the stress caused by fimming. Fimming during the flowering stage can severely impact the plant’s ability to produce a substantial harvest and should be avoided.
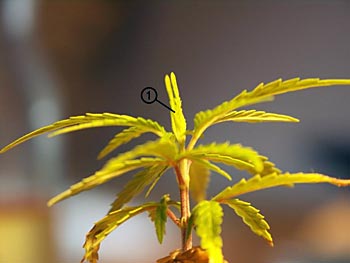
Step-by-Step Guide to Fimming
Performing a successful fimming requires precision and care. Follow these steps to achieve optimal results:
- Select the Top Growth Tip: Identify the topmost growth tip of your cannabis plant.
- Prepare the Plant: Gently pull back the small leaves surrounding the growth tip to expose it.
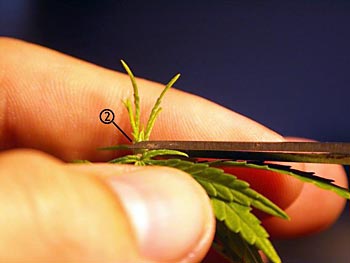
- Make the Cut: Using clean, sterilized pruning shears or scissors, make a single clean cut approximately 75-80% down the growth tip. Aim to remove a significant portion of the top while leaving some green growth intact.
- Repeat if Desired: If you wish to encourage lateral growth on other branches, repeat the fimming process on those specific growth tips.
- Monitor and Care: After fimming, closely monitor your plants for any signs of stress or infection. Provide proper care, including adequate lighting, watering, and nutrients, to support their recovery and continued growth.
Tips for Successful Fimming
To increase your chances of success when fimming cannabis plants, consider the following tips:
- Use Sterilized Tools: Before fimming, ensure that your pruning shears or scissors are sterilized to minimize the risk of introducing infections to the plant.
- Choose Healthy Plants: Fimming works best on healthy, vigorous plants. Select plants that are free from pests, diseases, or nutrient deficiencies to optimize the chances of a successful outcome.
- Timing is Key: Fimming should be done during the vegetative stage, once the plant has developed multiple nodes with branches and leaves. Avoid fimming during the flowering stage, as it can cause significant stress and reduce the plant’s ability to produce buds.
- Be Patient: After fimming, give your plants time to recover and adjust to the new growth pattern. Avoid additional stressors during this period to allow the plants to focus on healing and branching out.
- Observe and Adjust: Monitor your plants closely after fimming. If you notice any signs of stress, such as wilting or discoloration, adjust your care routine accordingly. Providing optimal growing conditions will aid in the recovery process.
Common Mistakes to Avoid
While fimming can be a highly effective technique, it’s essential to be aware of common mistakes that can hinder your success. Avoid the following pitfalls:
- Improper Timing: Fimming too early or too late in the growth cycle can result in poor recovery or stunted growth. Stick to the vegetative stage for optimal results.
- Insufficient Sterilization: Failing to sterilize your pruning tools before fimming can introduce pathogens to the plant, increasing the risk of infection and disease.
- Overfimming: Cutting too much of the growth tip can cause excessive stress and slow down the plant’s recovery. Aim to remove around 75-80% of the top while leaving some green growth intact.
- Inadequate Care: After fimming, provide your plants with proper care, including appropriate lighting, watering, and nutrient supplementation. Neglecting their needs can impede recovery and yield potential.
By avoiding these common mistakes, you’ll set yourself up for a successful fimming experience and maximize the benefits for your cannabis plants.
Frequently Asked Questions
Q1: Can I fim autoflowering cannabis plants? Yes, fimming can be done on autoflowering cannabis plants. However, keep in mind that autoflowers have a shorter life cycle, so timing is even more critical. Fimming should be performed early in the vegetative stage to allow the plant enough time to recover and develop lateral branches before flowering.
Q2: Does fimming increase the risk of hermaphroditism? Fimming, like any high-stress technique, can potentially induce hermaphroditism in cannabis plants. It’s crucial to choose stress-tolerant genetics and closely monitor your plants for any signs of male flowers. If hermaphroditism occurs, promptly remove the affected plants to prevent pollination.
Q3: Can I fim outdoor-grown cannabis plants? Absolutely! Fimming can be applied to both indoor and outdoor cannabis plants. However, keep in mind that outdoor plants may require additional protection against pests and harsh weather conditions. Regularly inspect your outdoor plants and provide appropriate care to ensure their health and productivity.
10. Monster Cropping
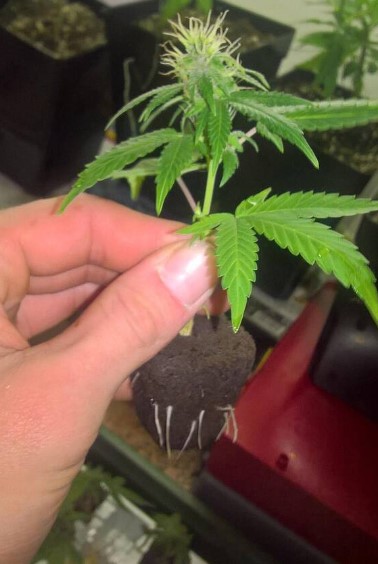
What is monster cropping?
Monster cropping is a cannabis plant training technique that allows growers to achieve continuous harvests without the need for a mother plant. The process involves taking clones from flowering plants and reverting them back to the vegetative stage. This technique takes advantage of the plant’s response to stress, resulting in dense, bushy growth with increased bud production. Unlike other plant training methods, monster cropping does not directly impact the growth of the current crop but rather focuses on the clones taken from flowering plants.
How does monster cropping affect cannabis plants?
Monster cropping induces stress on cannabis plants, which triggers their natural defense mechanisms and encourages vigorous growth. By taking clones from flowering plants and re-vegging them, growers can promote lateral growth and increase the number of bud sites. The stress caused by monster cropping also stimulates terpene production, resulting in a more aromatic final product. However, it’s important to note that monster cropping is suitable only for photoperiod cannabis strains and not autoflowers.
Is monster cropping worth it?
Monster cropping has its advantages and disadvantages, and its worthiness depends on various factors such as setup, strains, and grower experience. Some of the advantages of monster cropping include continuous harvests without the need for mother plants, maximized yields through bushy growth, and compatibility with other training techniques like topping and ScrOG. On the other hand, it doesn’t work with autoflowers, has a lower success rate for clone rooting compared to vegging plants, and takes longer to harvest due to the re-vegging process.
How much does monster cropping improve yields?
The exact improvement in yields from monster cropping can vary depending on several factors, including the grower’s experience. However, when done correctly, monster cropping can significantly increase yields. The re-vegged plants grow in a dense, bushy manner with more side branches, resulting in more buds exposed to light. Additionally, the increased lateral growth allows growers to fill their grow space more effectively. When combined with other training techniques like ScrOG, the potential for yield improvement is even greater.
How long does monster cropping take?
Monster cropping adds additional time to the growth cycle of cannabis plants. After taking the flowering clones, it takes about a week for them to root. The re-vegging process then takes approximately 2-3 weeks. Overall, expect the monster cropping process to add at least 3 weeks to the plant’s growth cycle, excluding any additional topping or training.
How to monster crop cannabis indoors
Tools and equipment
Before starting the monster cropping process, gather the following tools and equipment:
- Sharp scissors, knife, or scalpel
- Alcohol wipes to disinfect your tools
- Glass or container with water for soaking the cuttings
- Rooting gel (optional)
- Rockwool cubes or perlite as a rooting medium (optional)
Choosing the best flowering cannabis plant
To begin the monster cropping process, select the best flowering cannabis plant in your grow space. Look for a healthy plant with good growth and height. If you have multiple strains, you can choose several cuttings from each to determine which plants perform best.
Taking cuttings
Using a clean and disinfected cutting tool, take cuttings from the lower branches of the chosen flowering plant. Make diagonal cuts across the stem to provide more surface area for water absorption and root growth. It’s advisable to take more cuttings than needed to account for potential failures in rooting.
Rooting the cuttings
Immediately after taking each cutting, place the stem into a container with water or rooting gel. This will prevent air from entering the stem and killing the clone. Alternatively, you can transfer the cutting into a rooting medium like rockwool cubes or perlite.
Re-vegging the clones
To bring the clones back to the vegetative stage, adjust the light cycle to 18-24 hours of light per day. This can be done with artificial lighting or by placing the clones under natural sunlight. As the clones re-veg, they will exhibit unique growth patterns with round leaves and increased branching. This re-vegging phase typically lasts 3-4 weeks.
Optional: Plant training
Once the clones have fully re-vegged, you can apply various plant training techniques to promote lateral growth and maximize yields. Topping, super cropping, and low-stress training (LST) are all compatible with monster cropping. Additionally, combining monster cropping with the screen of green (SCROG) method can further enhance growth and bud production.
How to monster crop cannabis outdoors
Monster cropping can also be performed outdoors, allowing for the potential of two harvests in a single growing season. Here’s how to do it:
Planting the seeds
If you live in a warm climate without the risk of frost, you can plant your cannabis seeds outdoors directly. However, if you experience occasional frost, it is advisable to start your plants indoors under a vegging light cycle until the risk of frost has passed. Once the weather conditions are suitable, you can transplant the plants outdoors.
Harvesting the cannabis
Your first batch of buds will be ready to harvest in early spring, just before daylight savings time. This is also the time when your clones will start re-vegging. Harvest the mature buds and enjoy the fruits of your labor.
Second growing season
As the seasons change and the days get longer, your clones will naturally enter the flowering phase again. This means you can harvest them at the usual time in the fall, giving you two harvests in a single growing season. However, this method is only suitable for regions with no risk of frost throughout the year.
Monster cropping and the screen of green (SCROG) method
Combining monster cropping with the screen of green (SCROG) method can further maximize yields and promote even canopy growth. By installing a net over the plants and weaving the branches through it, growers can encourage horizontal growth and ensure that all buds receive adequate light. This technique is especially beneficial when growing in small spaces and can significantly increase overall harvests.
Should you try monster cropping your cannabis plants?
Monster cropping is a technique that requires some experience and knowledge of plant training. While it may not be suitable for beginners, experienced growers can benefit greatly from this method. It offers continuous harvests without the need for mother plants, maximizes yields through bushy growth, and can be combined with other training techniques for even better results. If you have the necessary skills and are willing to put in the effort, monster cropping is definitely worth a try.
Conclusion
Implementing cannabis training techniques can significantly increase yields and improve the overall quality of your harvest. Each technique offers unique benefits and advantages, allowing growers to manipulate their plants’ growth and structure to maximize bud production. Whether you choose to top, LST, supercrop, defoliate, lollipop, or explore more specialized techniques like SoG, manifolding, ScrOG, FIMming, or monster cropping, the key is to experiment and find the methods that work best for your specific needs and growing environment. By mastering these training techniques, you can optimize your cannabis cultivation and enjoy bountiful yields of top-quality buds.
Additional Information: It is important to note that cannabis training techniques should be tailored to the specific needs and characteristics of each strain. Some strains may respond better to certain techniques, while others may require different approaches. Always start with healthy plants and monitor their response to training techniques to ensure successful results.